CyberPanel的安裝(命令列)
目前網頁伺服器軟體以Apache、NginX為主,而這個網站則是選擇了使用LiteSpeed Server
而LiteSpeed Server的市佔率雖然不如Apache和NginX兩位前輩,但還是佔到了第四名,詳細可以參考Web Server Usage Distribution in the Top 1 Million Sites(世界前100萬的網頁伺服器使用統計)
其中可以看到LiteSpeed Server是有前五名的市佔率(以2021年6月時間點為排名第四名)
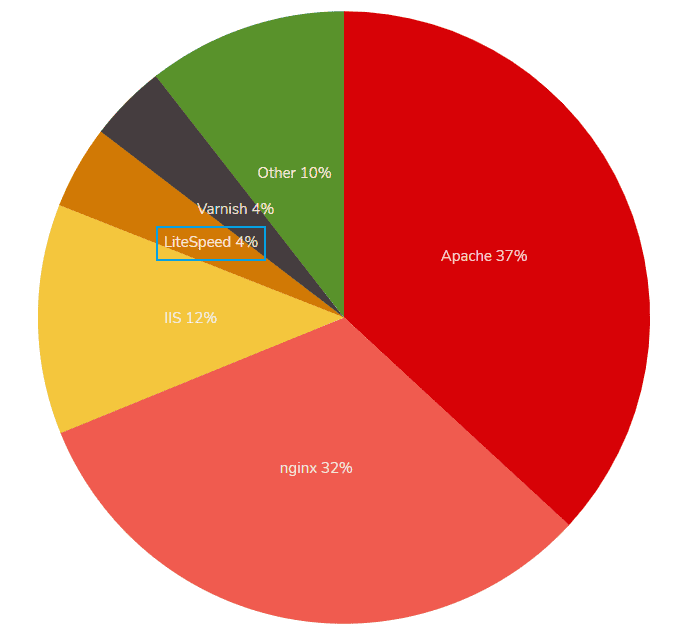
雖然以結果來看並不是很高的比例(前100萬的網站中才只有將近4萬的網站採用),但以這個網站本身的目的,本來就是走一些比較少人知道的知識(不然一狗票的直接抄來抄去就好)
當然,其實這樣選擇也有其他的考量,例如TTFB(Time To First Byte,伺服器接收到回應後反應第一個位元組的時間)、Load Time(網頁讀取時間)、壓力測試(Stress Test)都有相當幫助
雖然基本上我這個只是小網站,基本上應該不太會有爆量的問題,但如同前面所述,這是技術的分享,個人會把這個繼續留存做紀錄
至於相關的測試相關,可參考
OpenLiteSpeed vs Nginx in WordPress – TTFB, Load Time, Stress Test Results
Openlitespeed和Nginx在Wordpress相關效能的對決
How Does LiteSpeed Compare to Apache and nginx?(Benchmark Overview,官方網站)
Litespeed如何和Apache和nginx比較
我想可能會有不少爭議,但我想就以技術方面來講,我選擇了LiteSpeed Server的陣營
講了那麼多,我似乎把LiteSpeed Server和OpenLiteSpeed混在一起,不過這邊要澄清一點:其實他們基礎上是一樣的東西,就只是一個是商業付費(LiteSpeed Server,但有單一網域免費的方案),另一個則是開源免費(OpenLiteSpeed,雖然對於.htaccess沒有寫入功能,但有其他的補救方式,之後的文章會提到)
之所以要從安裝CyberPanel講解的原因,其實是因為在安裝CyberPanel當下,會連同OpenLiteSpeed一起安裝;如果有支付LiteSpeed Server費用的話,也可以這邊做選擇是安裝OpenLiteSpeed或是LiteSpeed Server
安裝方式如下
- 安裝CyberPanel(以CentOS8為作業系統為例)
雖然我個人非常討厭使用命令列,但是在作業系統本身就是以命令列為主的狀況下,還是按照下面步驟輸入吧
輸入指令
在登入為root帳號下,輸入下面指令
dnf update此為系統更新(更新是為了防止系統的安全漏洞)
sh <(curl https://cyberpanel.net/install.sh || wget -O - https://cyberpanel.net/install.sh)上述指令為安裝CyberPanel的指令
基本上就是按下Yes才會進入下一步
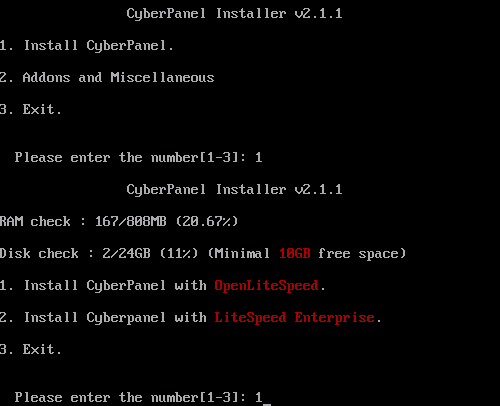
1. Install CyberPanel.

2. Addons and Miscellaneous

3. Exit.

Please enter the number[1-3]: 1
這裡當然就選擇1. 的Install CyberPanel
1. Install CyberPanel with OpenLiteSpeed.

2. Install Cyberpanel with LiteSpeed Enterprise.

3. Exit.

Please enter the number[1-3]: 1
這裡則是選擇免費版的OpenLiteSpeed或是付費的LiteSpeed Enterprise(但也有一個網域免費版的版本),這裡選擇1(免費版的)
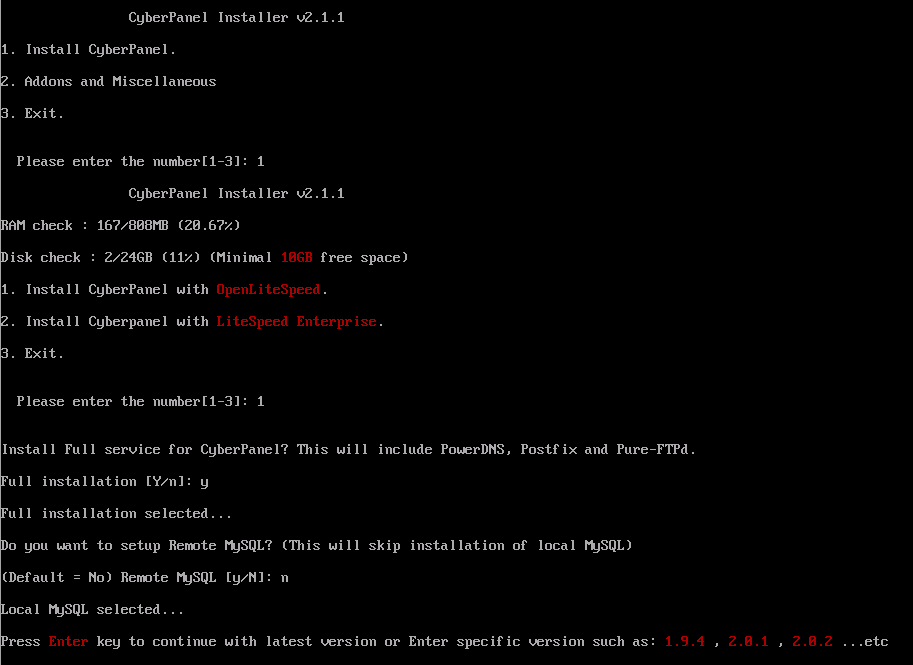
Install Full service for CyberPanel? This will include PowerDNS, Postfix and Pure-FTPd.

Full installation [Y/n]: Y

Full installation selected...

Do you want to setup Remote MySQL?(This will skip installation of local MySQL)

(Default = No) Remote MySQL [y/N]:n

Local MySQL selected...

Press Enter key to continue with latest version or Enter specific version such as: 1.9.4 , 2.0.1 , 2.0.2 ...etc
詢問是否要安裝完整的服務項目(如包含PowerDNS、Postfix和Pure-FTPd等),這邊當然就是選擇Y囉
而下一個則是詢問MySQL(資料庫管理系統)是使用遠端的嗎?
由於資料庫管理系統還是以本機(指安裝系統的機器)為主,放在本機以外的資料庫管理系統總是會多了一層安全的問題,故這邊選擇n
至於是否要安裝特定版本,這個就依據個人需求,個人這邊是直接按<kbd>Enter</kbd>鍵安裝CyberPanel的最新版本
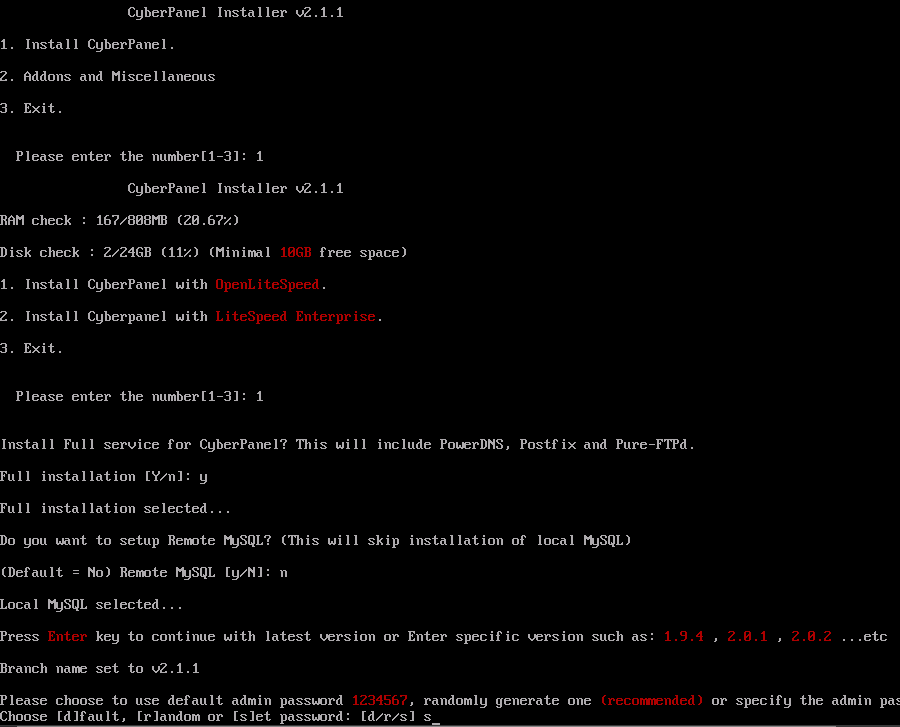
Please choose to use default admin password 1234567, randomly generate one (recommended) or specify the admin password?
Choose [d]fault, [r]andom or [s]et password: [d/r/s] s


Admin password will be provided once installation is completed...
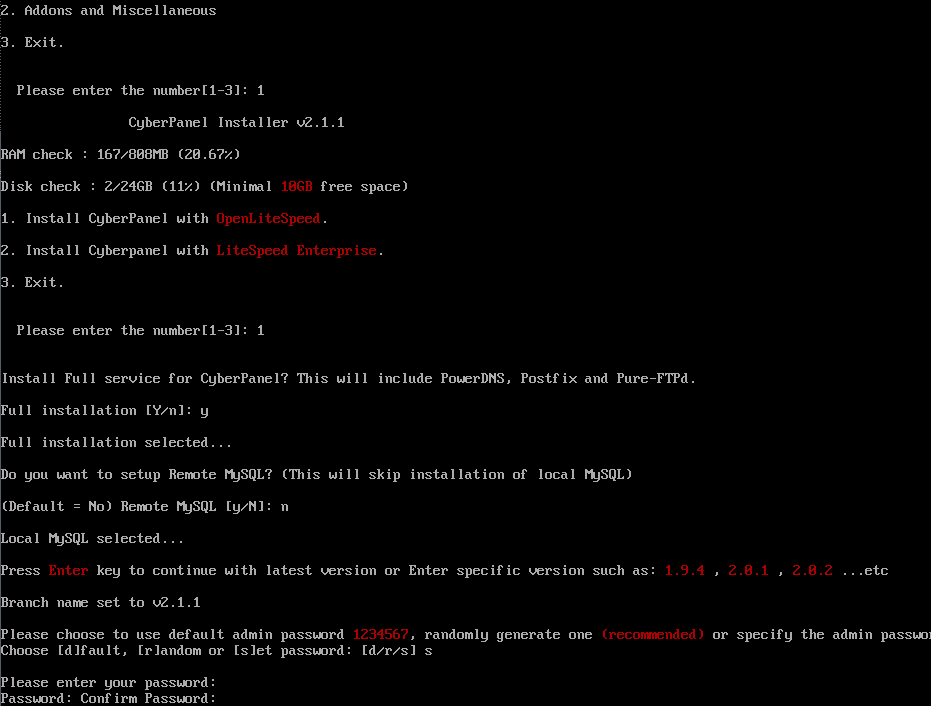
這裡是詢問「CyberPanel」的密碼要怎麼設定;選擇[d]的話密碼是1234567,選擇[r]的話則是會隨機產生密碼,選擇[s]的話則是自己設定密碼(需要連續輸入兩次,這邊是看不到你輸入的東西,所以請仔細輸入),我個人則是選擇自己設定密碼
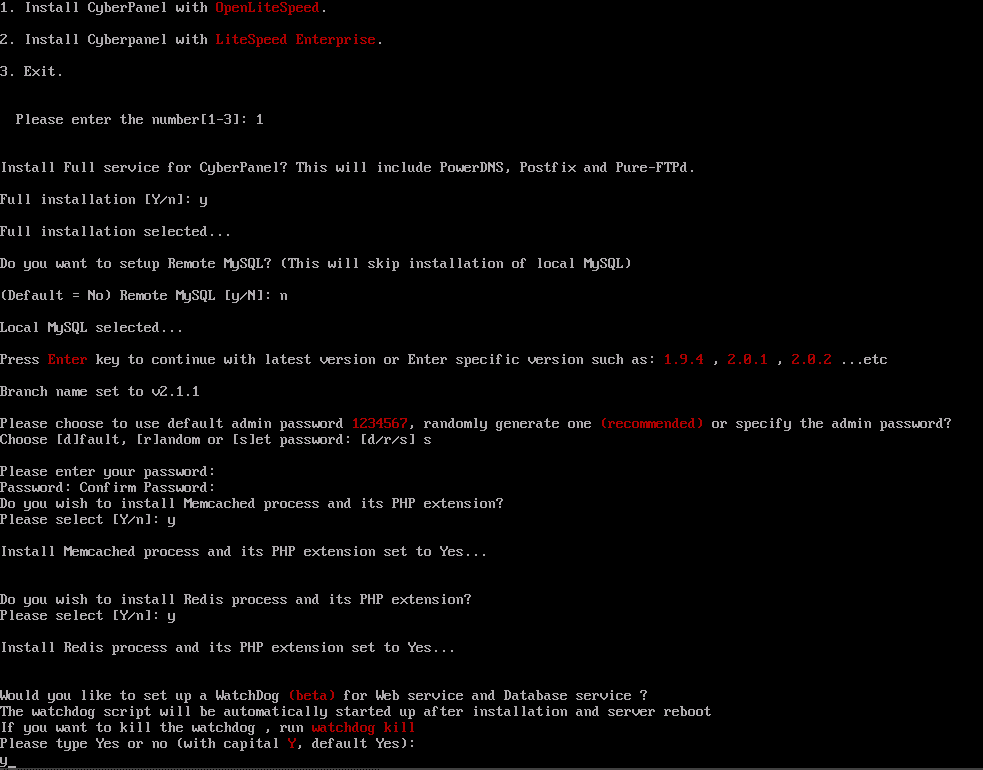
Do you wish to install Memcached process and its PHP extension?
Please select [Y/n]: Y

Install Memcached process and its PHP extension set to Yes...

Do you wish to install Redis process and its PHP extension?
Please select [Y/n]: Y

Install Redis process and its PHP extension set to Yes...

Would you like to set up a WatchDog (beta) for Web service and Database service ?
The watchdog script will be automatically started up after installation and server reboot
If you want to kill the watchdog , run watchdog kill
Please type Yes or no (with capital Y, default Yes):
Y
這邊詢問是否要要安裝Memcached、Redis 和 WatchDog,前面兩個和WordPress的LiteSpeed Cache有配合,所以一定要安裝選擇y;而WatchDog則是和安全有關的,所以也是安裝選擇y

最後的畫面就是長這樣,「VPS的IP:7080」的帳號密碼要記一下(這裡是自動生成),如果真的不小心忘記的話,後面有補救方法
※注意:「VPS的IP:8090」是「CyberPanel」的登入控制台,而「VPS的IP:7080」則是「OpenLiteSpeed」的登入控制台
更改OpenLiteSpeed的WebAdmin介面密碼
真的不小心忘記OpenLiteSpeed的WebAdmin介面密碼時也不用慌,同樣在命令列分別輸入下列指令
cd /usr/local/lsws/admin/misc/./admpass.sh接著它就會要求你輸入你的新密碼(連續兩次)
以上便完成了CyberPanel的命令列安裝部分
參考資料:
原文連結Cyrians
Like my work? Don't forget to support and clap, let me know that you are with me on the road of creation. Keep this enthusiasm together!