真・用 OpenAPI 打通前後端任督二脈

前一篇〈OpenAPI 打通前後端任督二脈〉介紹了 OpenAPI,以及與 OpenAPI 深度整合的 Python web 框架 FastAPI,但在前端部份,身為 Swagger 家族~祖傳~正宗~本家~嫡系~的 Swagger Client 卻不怎麼香,沒帶來多少便利性,也無法讓我們少奮鬥三十年。
直到最近又看到另外一套 openapi-typescript-codegen,用了覺得真的挺不錯的,特地撰文以資表揚。
顧名思義,openapi-typescript-codegen 會讀入 OpenAPI 定義的 API 規格,並產出一系列 TypeScript 模組,讓我們在前端專案可以方便調用。
安裝
它的安裝方式如同一般典型 JS 套件:
$ npm install openapi-typescript-codegen --save-dev
產生 OpenAPI 客戶端模組
安裝後專案內會多一個 openapi 命令可以調用,我們用它來產出 API 的 TS 模組:
$ npx openapi --input http://localhost:5000/openapi.json --output ./src/client
上面的參數應該是可以望文生義,那個來源的 openapi.json 檔案可能如下:

{
  "openapi": "3.0.2",
  "info": {
    "title": "FastAPI",
    "version": "0.1.0"
  },
  "servers": [
    {
      "url": "http://localhost:5000"
    }
  ],
  "paths": {
    "/items/{item_id}": {
      "get": {
        "summary": "Read Item",
        "description": "Read item by id.",
        "operationId": "read_item",
        "parameters": [
          {
            "required": true,
            "schema": {
              "title": "Item Id",
              "type": "integer"
            },
            "name": "item_id",
            "in": "path"
          }
        ],
        "responses": {
          "200": {
            "description": "Successful Response",
            "content": {
              "application/json": {
                "schema": {
                  "$ref": "#/components/schemas/Item"
                }
              }
            }
          },
          "422": {
            "description": "Validation Error",
            "content": {
              "application/json": {
                "schema": {
                  "$ref": "#/components/schemas/HTTPValidationError"
                }
              }
            }
          }
        }
      },
      "delete": {
        "summary": "Delete Item",
        "description": "Delete item by id.",
        "operationId": "delete_item",
        "parameters": [
          {
            "required": true,
            "schema": {
              "title": "Item Id",
              "type": "integer"
            },
            "name": "item_id",
            "in": "path"
          }
        ],
        "responses": {
          "200": {
            "description": "Successful Response",
            "content": {
              "application/json": {
                "schema": {}
              }
            }
          },
          "422": {
            "description": "Validation Error",
            "content": {
              "application/json": {
                "schema": {
                  "$ref": "#/components/schemas/HTTPValidationError"
                }
              }
            }
          }
        }
      }
    }
  },
  "components": {
    "schemas": {
      "HTTPValidationError": {
        "title": "HTTPValidationError",
        "type": "object",
        "properties": {
          "detail": {
            "title": "Detail",
            "type": "array",
            "items": {
              "$ref": "#/components/schemas/ValidationError"
            }
          }
        }
      },
      "Item": {
        "title": "Item",
        "required": [
          "id",
          "name",
          "quantity"
        ],
        "type": "object",
        "properties": {
          "id": {
            "title": "Id",
            "type": "integer"
          },
          "name": {
            "title": "Name",
            "type": "string"
          },
          "quantity": {
            "title": "Quantity",
            "type": "integer"
          }
        }
      },
      "ValidationError": {
        "title": "ValidationError",
        "required": [
          "loc",
          "msg",
          "type"
        ],
        "type": "object",
        "properties": {
          "loc": {
            "title": "Location",
            "type": "array",
            "items": {
              "type": "string"
            }
          },
          "msg": {
            "title": "Message",
            "type": "string"
          },
          "type": {
            "title": "Error Type",
            "type": "string"
          }
        }
      }
    }
  }
}
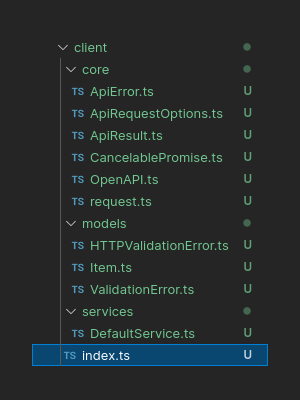
以這份 openapi.json 為例,產生出的程式如下:

其中 core/ 是通用的請求模組,跟 API 規格有關的在 models/ 和 services/ 內,在深入他們之前我們先看 index.ts 暴露了哪些模組:
/* istanbul ignore file */
/* tslint:disable */
/* eslint-disable */
export { ApiError } from './core/ApiError';
export { CancelablePromise, CancelError } from './core/CancelablePromise';
export { OpenAPI } from './core/OpenAPI';
export type { OpenAPIConfig } from './core/OpenAPI';

export type { HTTPValidationError } from './models/HTTPValidationError';
export type { Item } from './models/Item';
export type { ValidationError } from './models/ValidationError';

export { DefaultService } from './services/DefaultService';
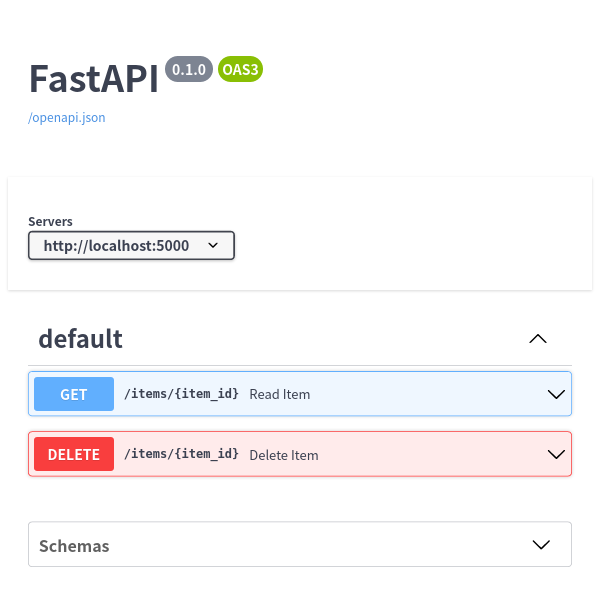
對照上面 Swagger UI 的資訊,DefaultService 對應的是 Swagger UI 的 Default 區塊,而 Item 這個型別定義當然也是對應到 Swagger UI 中的 Item schema 囉!
使用 OpenAPI 客戶端模組
使用上也很簡單,例如要向「Read Item」要資料:
import { DefaultService } from './client';

let itemId = 102082;

async function readItem( () => {
  const response = await DefaultService.readItem( itemId );
  consle.debug( response );
})
受惠於產生器和 TypeScript 完整的型別定義特性,IDE 的提示和補完機能得以滿載發揮,你幾乎不用去看 Swagger UI 就能給出該支 API 所需要的資料。
又或者要刪某筆 Item:
import { DefaultService } from './client';

let itemId = 102002;

async function deleteItem( () => {
  const response = await DefaultService.deleteItem( itemId );
  consle.debug( response );
})
不論是 GET、DELETE、POST、PUT 等等,都是如此這般調用,再也不用手刻 xxx 攔截器,再也不用自行二次封裝,靠 openapi-typescript-codegen 給的懶人包就能讓我們優雅的調用 API。
身份認證
要附加認證資訊當然也是可以的,OpenAPI 本身就支援好幾種 security scheme,而 openapi-typescript-codegen 則支援 HTTP Basic 認證 和 OAuth 2 的 access token 認證。
以 access token 為例,可以這麼使用:
import { OpenAPI, DefaultService } from './client';

OpenAPI.TOKEN = 'eyJhbGciOiJIUzI1NiIsInR5cCI6IkpXVCJ9.eyJzdWIiOiIxMjM0NTY3ODkwIiwibmFtZSI6IkpvaG4gRG9lIiwiaWF0IjoxNTE2MjM5MDIyfQ.SflKxwRJSMeKKF2QT4fwpMeJf36POk6yJV_adQssw5c'

let itemId = 102082;

async function readItem( () => {
  const response = await DefaultService.readItem( itemId );
  consle.debug( response );
})
只要這麼一行,下面的所有交互都會自動附上該 token,蒸的很棒!
至於那 access token 該怎麼來就取決於 API 服務端的設計,如果是 OAuth 2 password flow,僅須一次交互,那也可以用產生的客戶端模組取得,如果是需要多次交互的,例如 OAuth 2 implicit flow、authorization code flow、PKCE flow 等,那就要自己動手取得囉,畢竟那些複雜的 flow 還有可能需要「前端的後端」參與,無法單靠一個前端套件搞定。
上面引入的 OpenAPI 是一個 OpenAPIConfig 型態的物件,除了可以用來配置 token 外,也可以配置發出請求時的 HTTP 標頭等參數,取決於需求運用囉!
結語
OpenAPI 已經是實質的產業標準,許多 open data 供應方都有提供 OpenAPI 文件,配合 openapi-typescript-codegen 就可以加快客端的開發腳步,而如果是自有產品,那前後端之間更是需要像 OpenAPI 這樣的橋樑建立起溝通的管道,除非你很喜歡用 Word 寫文件。
相較於在 Word 寫,直接從程式碼轉出成 OpenAPI 顯得有效率多了,後端從程式碼產生 OpenAPI 文件,前端再從 OpenAPI 文件產生程式,就像一條運作順暢的流水線,自在極意、通體舒暢。
除了 Python 的 FastAPI,其他的框架大都有內建或外掛的 OpenAPI 整合,例如 APIFlask、Strapi、Directus 等等,可以多加利用。
