AutoGPT【教学】5 分钟保姆级安装方法
随着 ChatGPT 在互联网上的爆炸式增长,许多人对 OpenAI 的 GPT 技术的强大功能和实用性印象深刻。这激发了制作自动 ChatGPT 的想法,它可以回答并生成自己的提示以实现特定目标。这个想法后来将作为 Auto-GPT 进行。
由于 Auto-GPT 仍在开发中,您只能像开发人员一样访问 Auto-GPT——这可能需要一些技术知识。
为了让您更轻松,这里提供了有关如何下载和安装 Auto-GPT 的分步指南。安装的过程虽然涉及Python 及命令提示字元等,看起来好像很复杂,但小编实测过,依照下面的步骤的话,实际上只需要5 分钟就能完成安装。
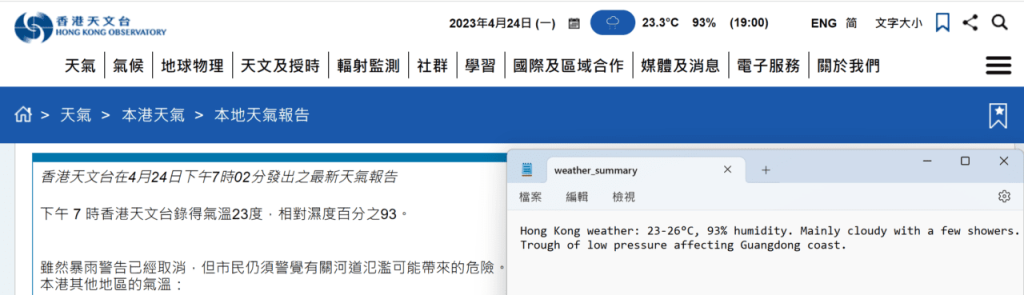
▲ AutoGPT 可以连网获得最新的资讯,就连即时天气也难不到它

▲除了即时天气外,你也可以利用AutoGPT 查阅恒生指数收市价格
想知道如何使用能够连接网络的人工智能机械人吗?现在就让小编和大家分享如何安装AutoGPT 吧。
安装要求:
Python 3.8 或更新的版本
OpenAI 帐户及API Key
下载Python:
下载连结:https://www.python.org/downloads/
点击上面的连结后会看见下图的Python 官方下载页面。按Download Python 的黄色按钮(绿色框示)下载后直接安装便可。只要是Python 3.8 或以上的版本,都能够运行AutoGPT。
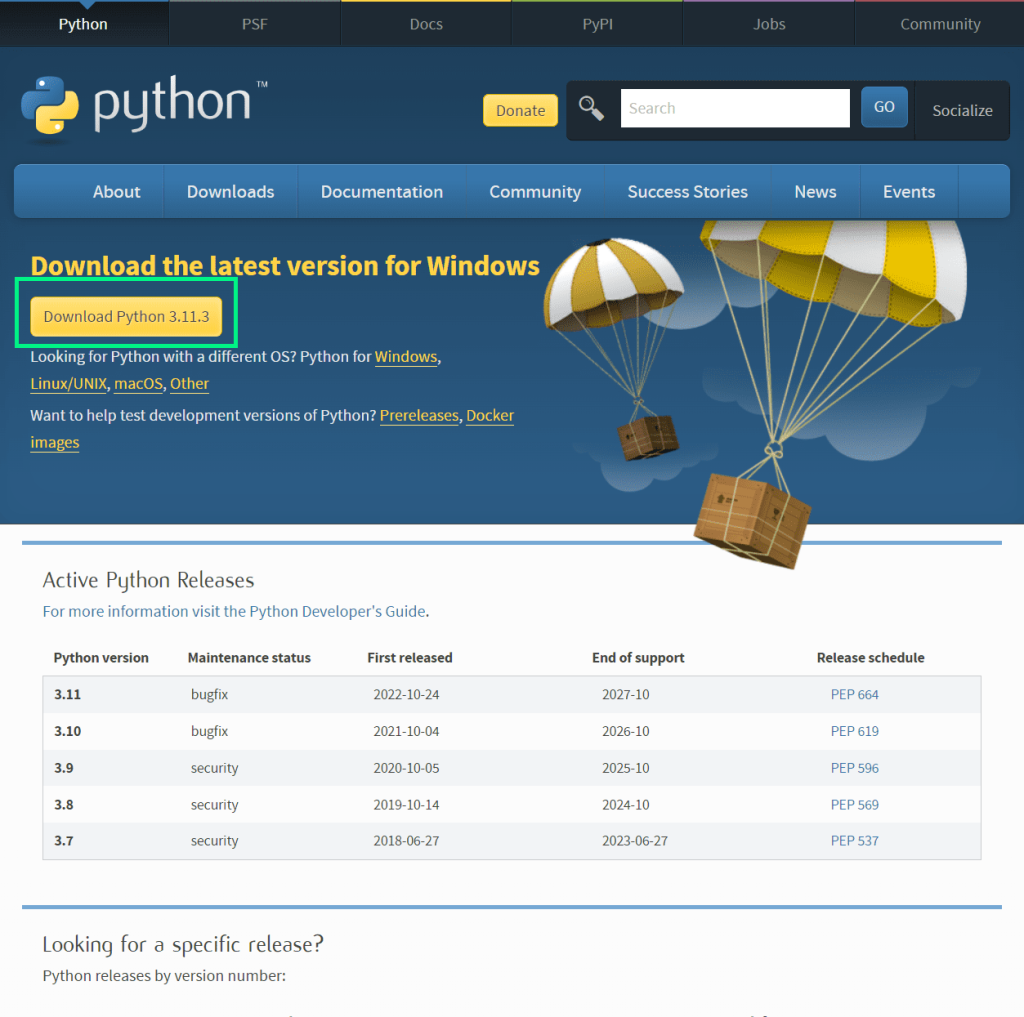
▲Python 官方下载页面,点击黄色按钮就可以下载最新的Python
安装AutoGPT
Step 1 开启命令提示字元(cmd.exe)
在搜寻列输入「cmd」,开启命令提示字元
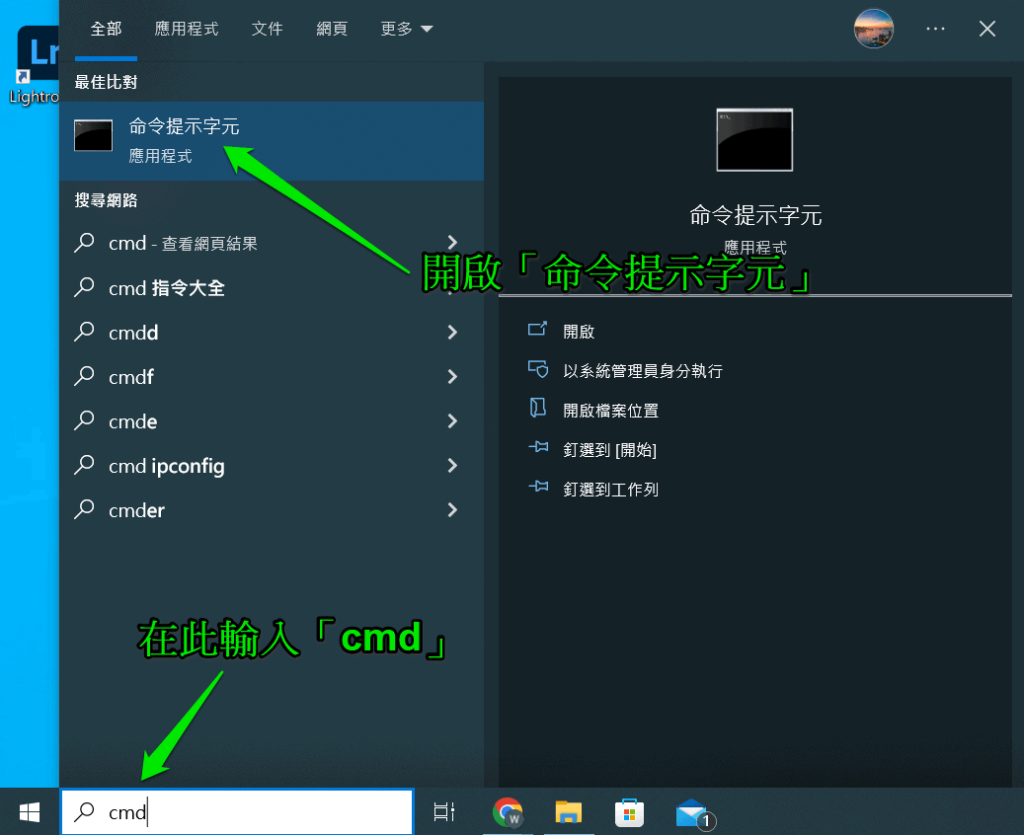
▲开启「命令提示字元」
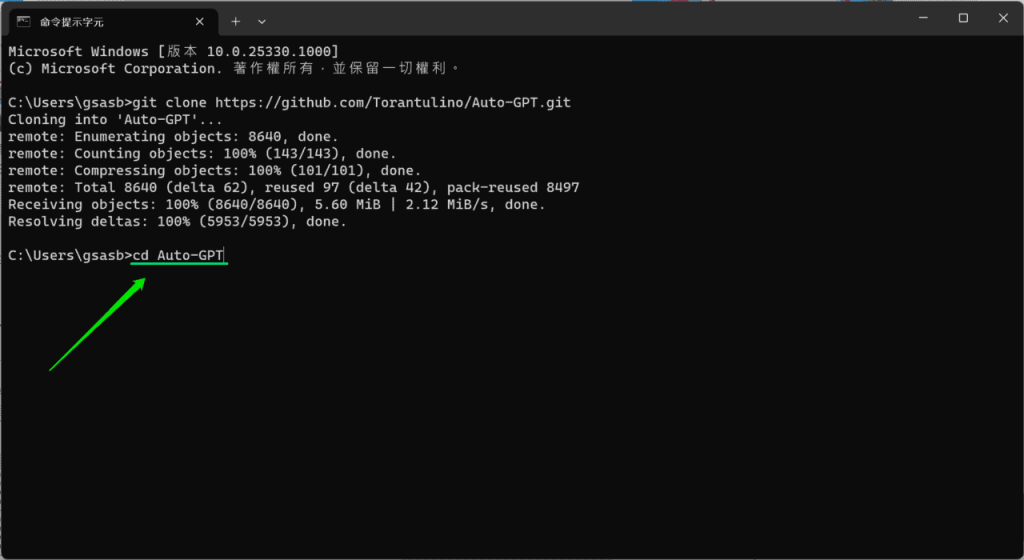
开启后会看见此画面,在此处输入以下指令。
git clone https://github.com/Torantulino/Auto-GPT.git
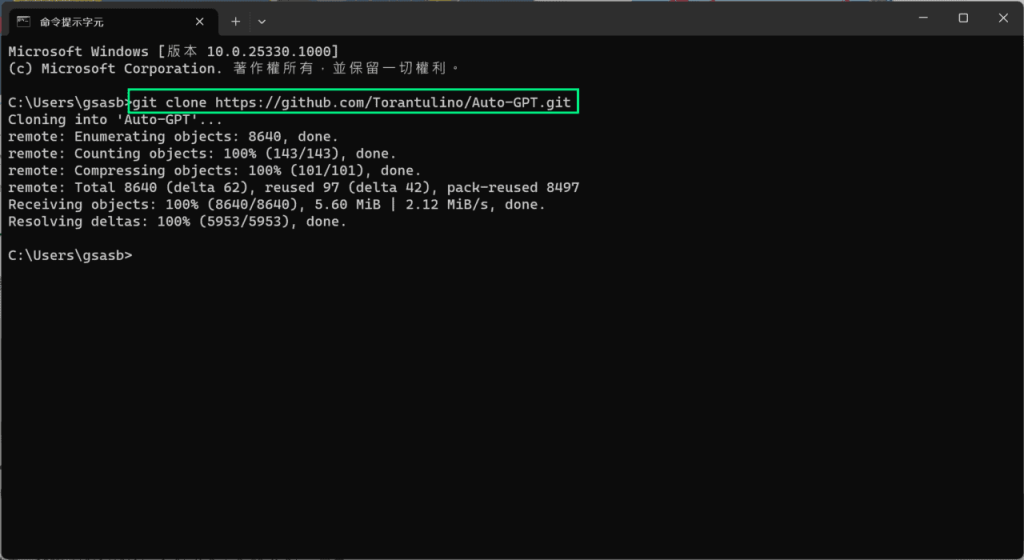
▲输入后会看见这个画面
完成下载后,AutoGPT 会预设在这个路径:
C://User//[你的用户名称]//Auto-GPT
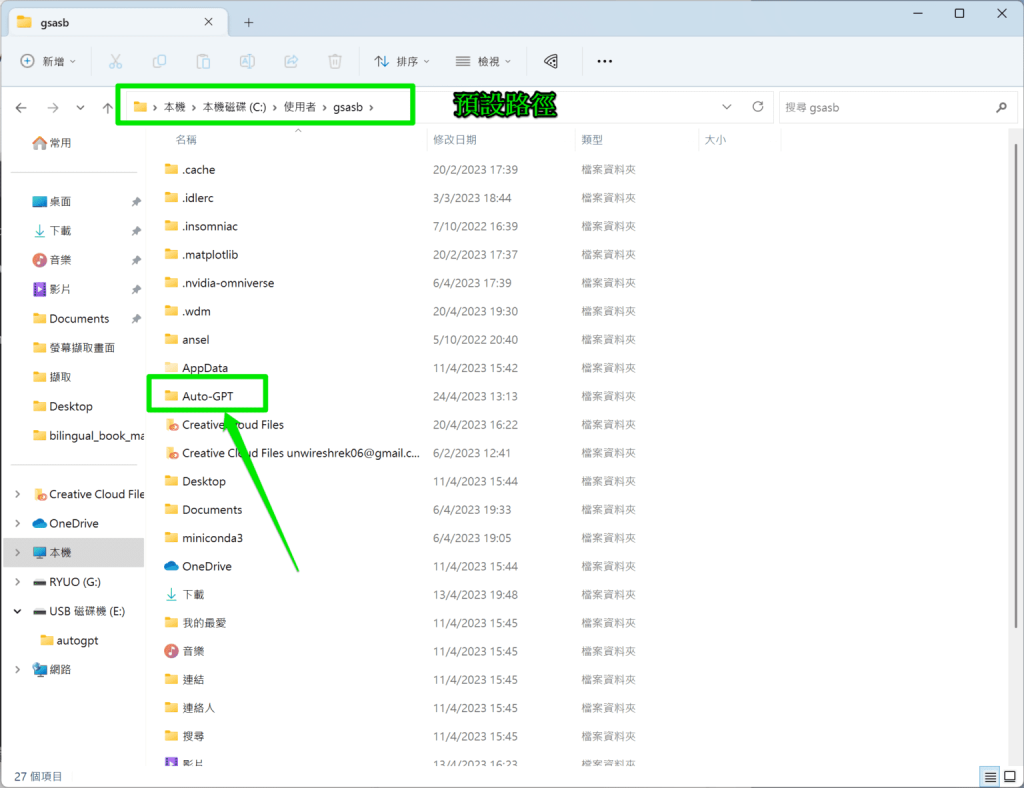
▲看见「Auto-GPT」文件夹(箭嘴示)就代表你已成功安装
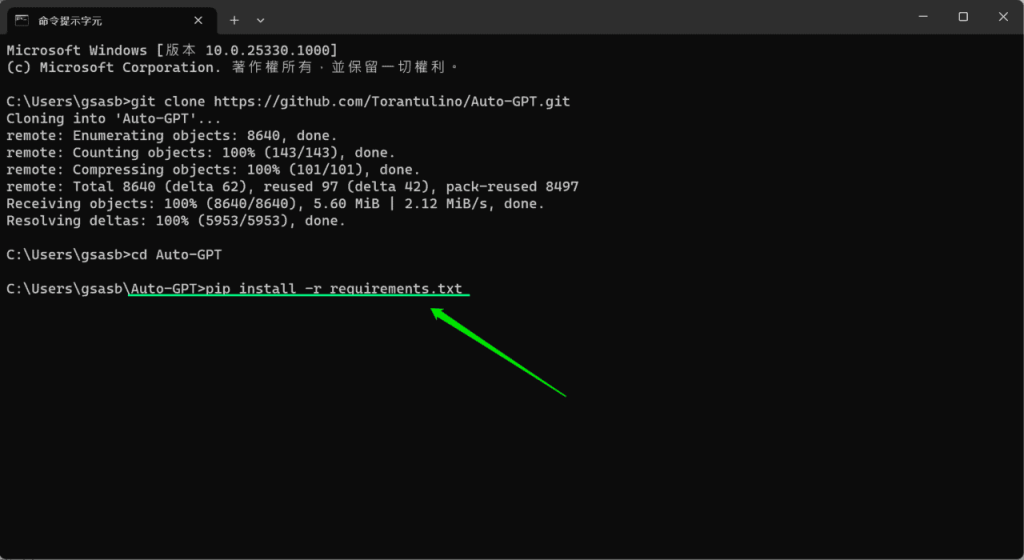
确认成功安装AutoGPT 后,我们可以回到刚才的「命令提示字元」画面,输入以下指令:
cd Auto-GPT
▲输入指令后没有反应是正常的
然后再输入以下指令,安装AutoGPT 所需的其他档案。
pip install -r requirements.txt
-r requirements.txt 安装完成后会看见下图的画面,这代表已安装好AutoGPT 所需的所有档案。接下来我们需要登入OpenAI 官方网站,以取得API Key。
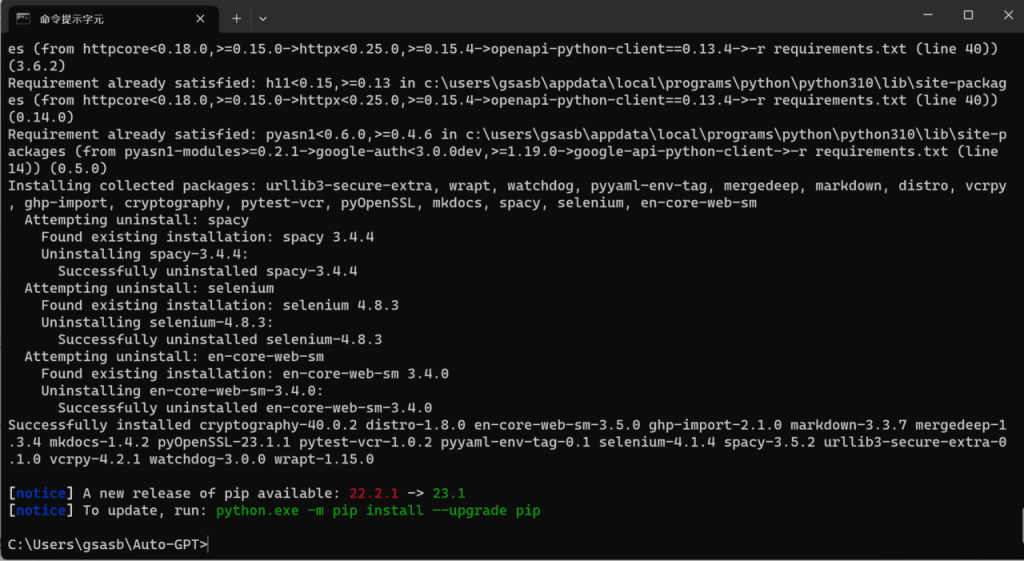
▲看见这画面就代表已完成安装AutoGPT
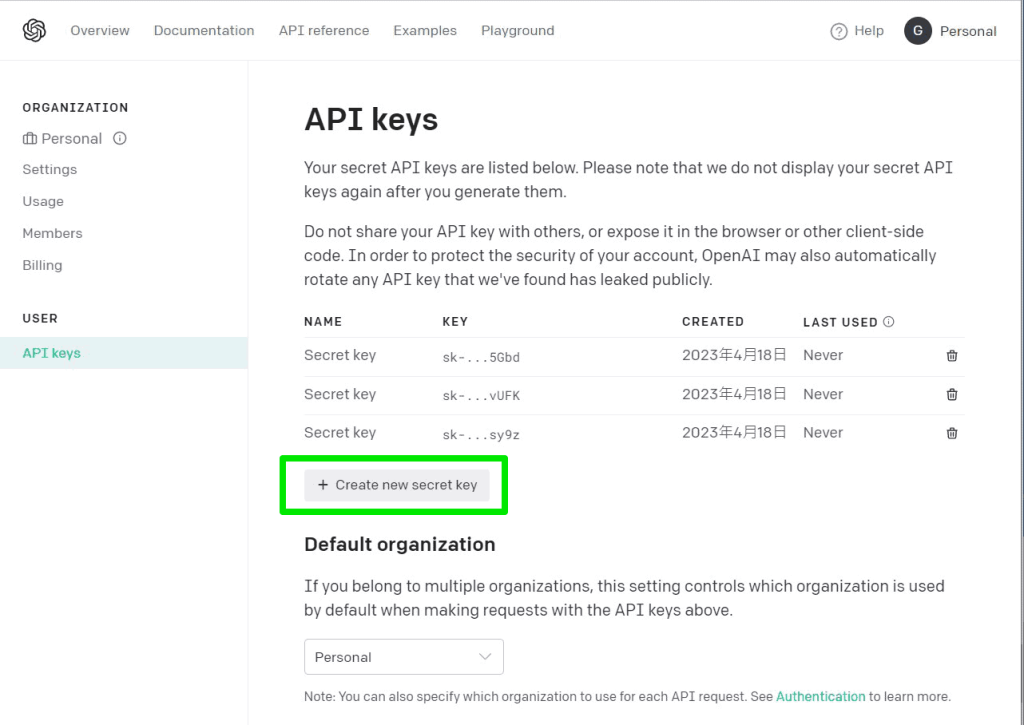
Step 2:取得OpenAI API Key
OpenAI API Key 连结:https://platform.openai.com/account/api-keys
登入前首先要检查是否已连接VPN ,避免帐户被OpenAI 封锁。
登入后会看见以下画面,点击Creat new secret key 键(绿色框示)就可以生成一个新的OpenAI API Key。要注意的是,现在不能查阅以往生成的API Key,所以你需要记下这个API Key,复制到任何地方也可。除了登记AutoGPT 外,之后申请其他使用OpenAI API Key 的服务也可以使用同一API Key。
▲ 点击Creat new secret key 就可以生成API Key
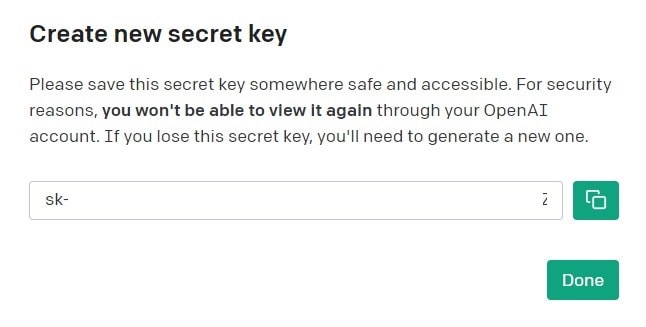
▲ API Key 只会在此时出现一次,生成后一定要记低,否则又要再生成一次
之后回到刚才AutoGPT 的文件夹寻找「.env.template」档案,点击滑鼠右键,选择以「记事本」开启「.env.template」档案。之后在「.env.template」档里寻找「your-openai-api-key」字串,将你刚才从OpenAI 官网取得的API Key 贴上并取代「your-openai-api-key」字串,然后储存。
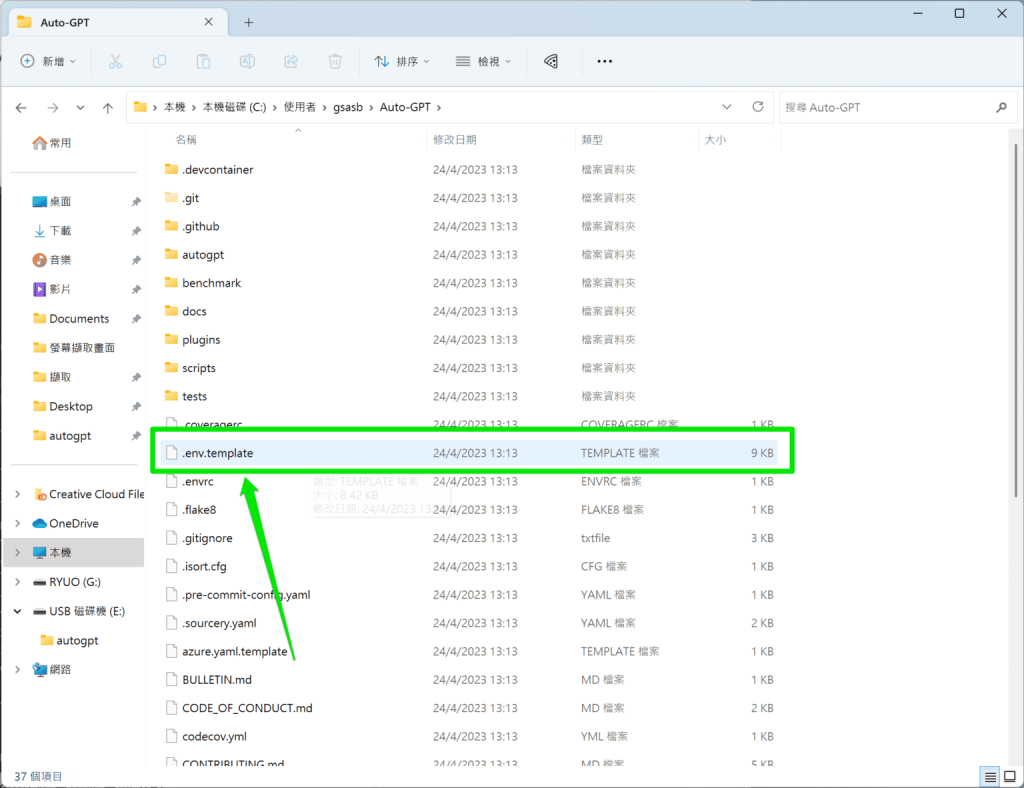
▲以记事本打开绿框框住的「.env.template」档案
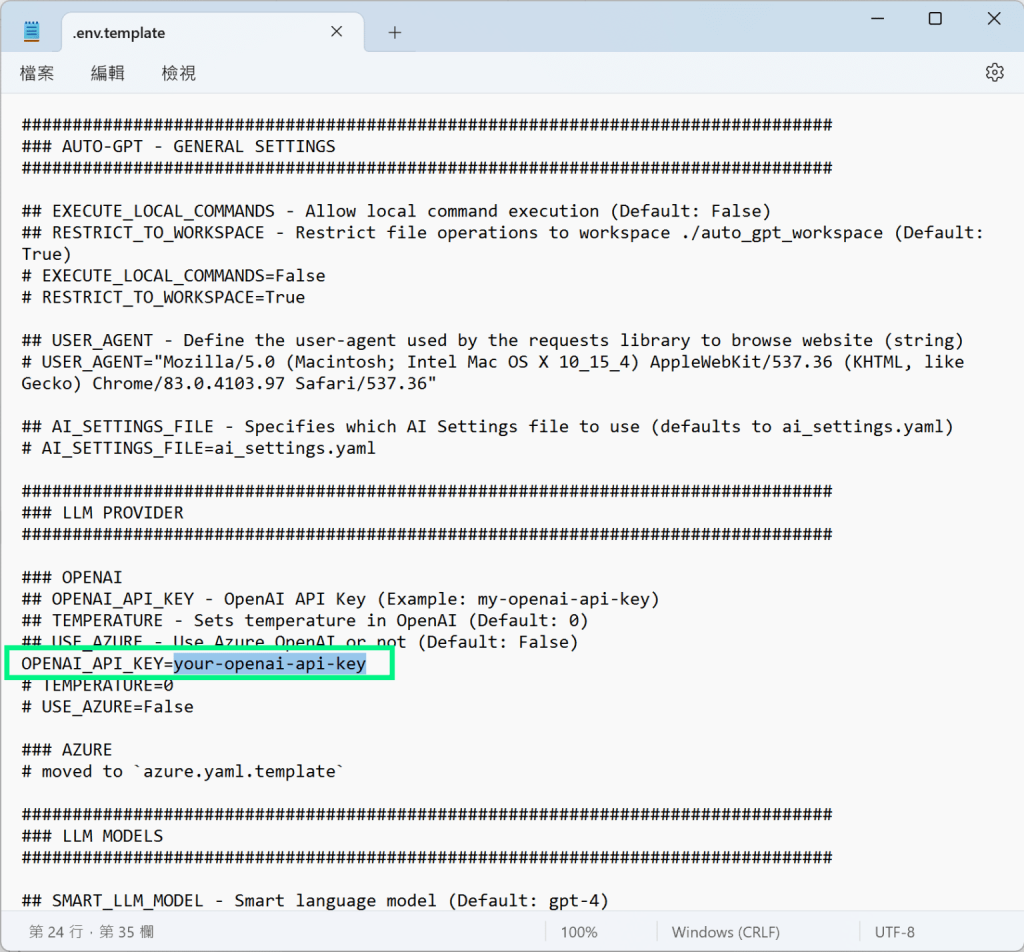
▲找到「your-openai-api-key」字串
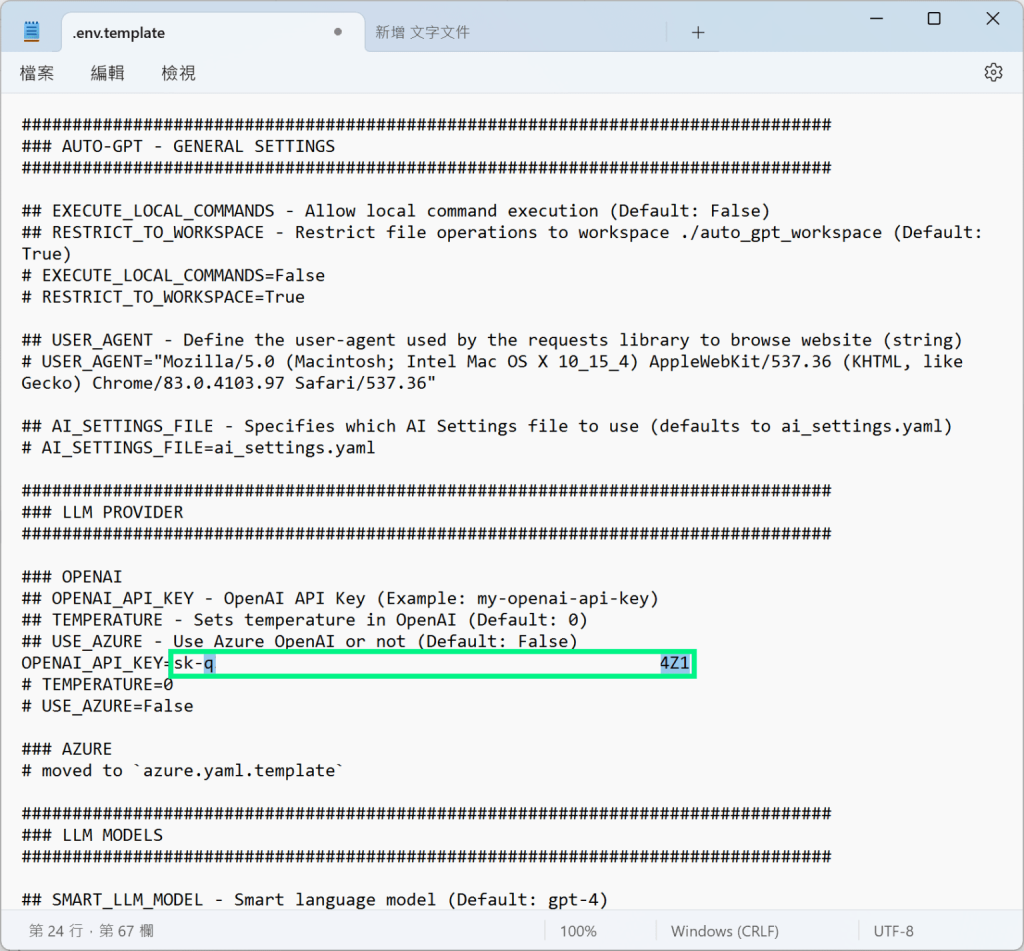
▲贴上你的API Key,取代「your-openai-api-key」字串
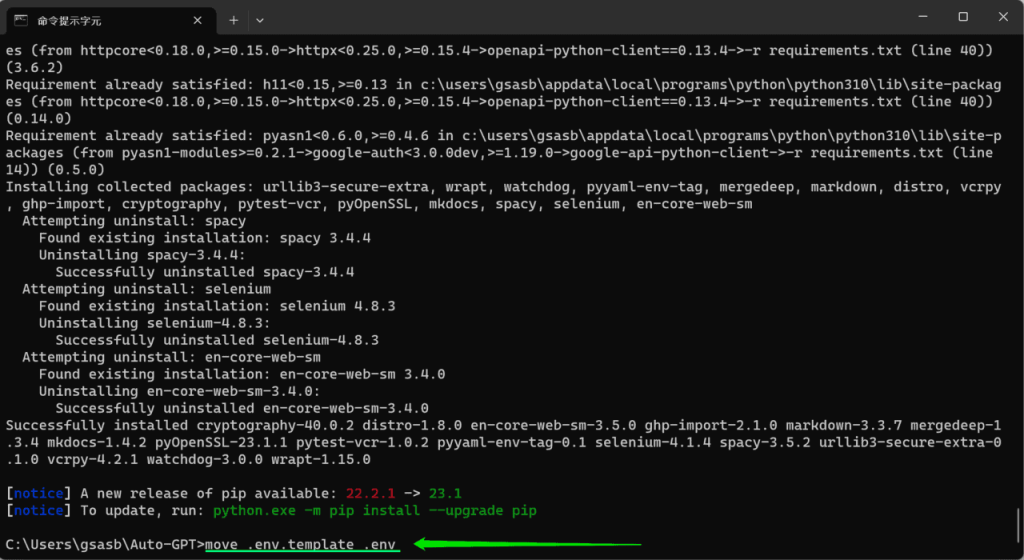
接下来我们回到「命令提示字元」画面,输入以下指令:
move .env.template .env
▲输入move .env.template .env指令
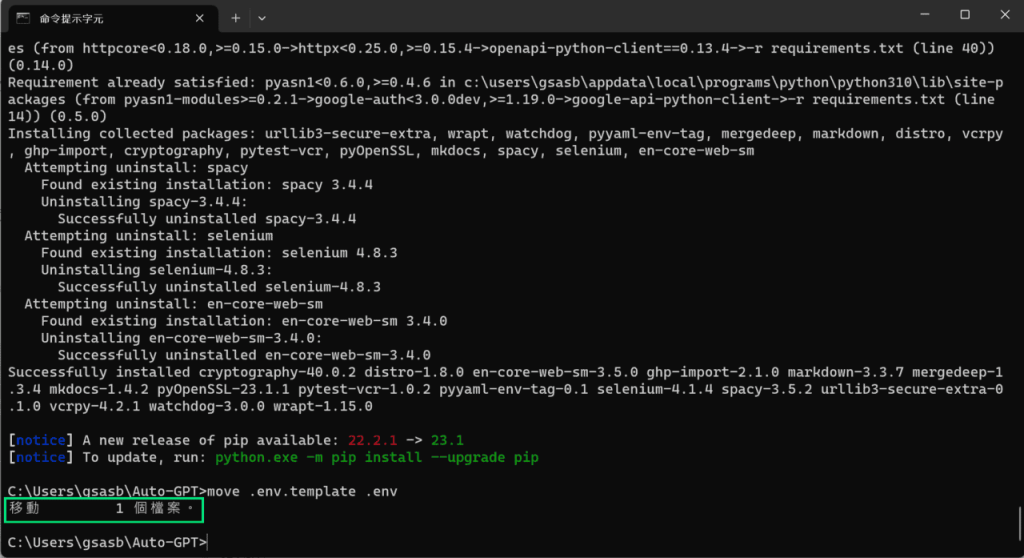
▲看见「移动1 个档案」的字样(绿框示)就代表已成功移动档案
完成了以上步骤就表示AutoGPT 已经收到你的OpenAI API Key,接下来就可以开始使用AutoGPT 了。
Step 3:开始使用AutoGPT
在「命令提示字元」中输入以下指令,我们就可以开始使用AutoGPT 了。
python -m autogpt
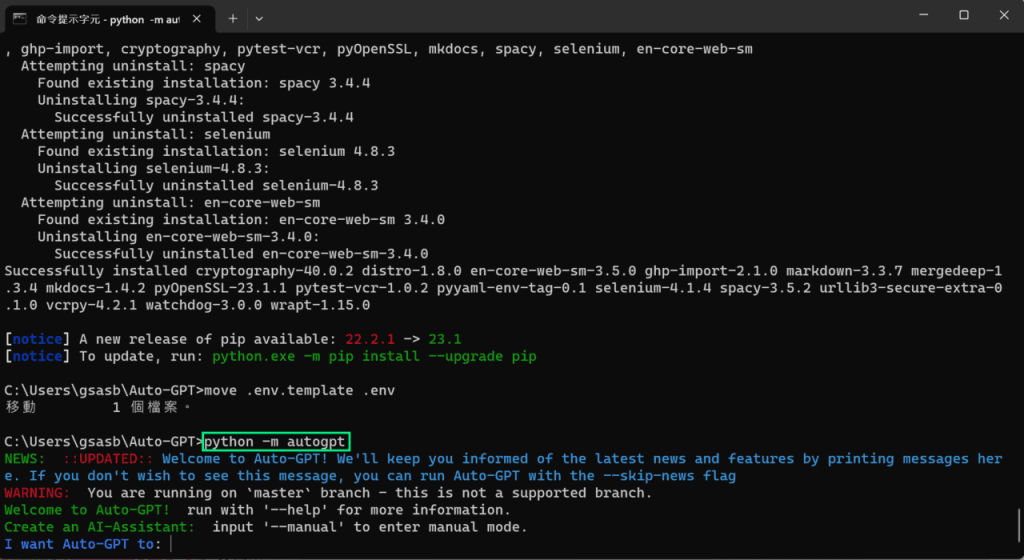
▲输入上述指令后会看见这个画面,代表可以开始使用AutoGPT
如果你之前关闭了「命令提示字元」,再次开启时只需要先输入「cd auto-gpt」,再输入「python -m autogpt」就可以使用AutoGPT。
▲每次重开启「命令提示字元」时都要先输入「cd auto-gpt」,再输入「python -m autogpt」
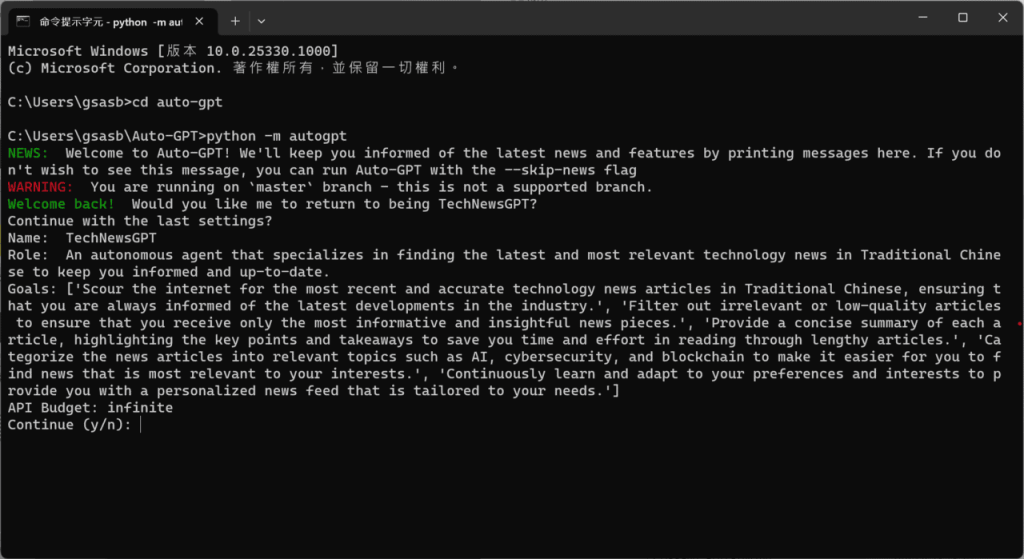
AutoGPT 功能实测
自动模式——较简单但只能填写一个目标
一开始启动AutoGPT 时,它会预设为自动模式。自动模式下AutoGPT 只能够输入1 个想AutoGPT 帮你完成的目标,AutoGPT 会自动替你的人工智能聊天机械人改名和填写用途。你只需要填写你想要AutoGPT 为你做什么。例如小编想以AutoGPT 获得即日恒生指数收市价格,于是就输入了以下的指令:
在yahoo 财经取得2023年4月24日恒生指数收市价格,转存为TXT ,完成后自动关闭
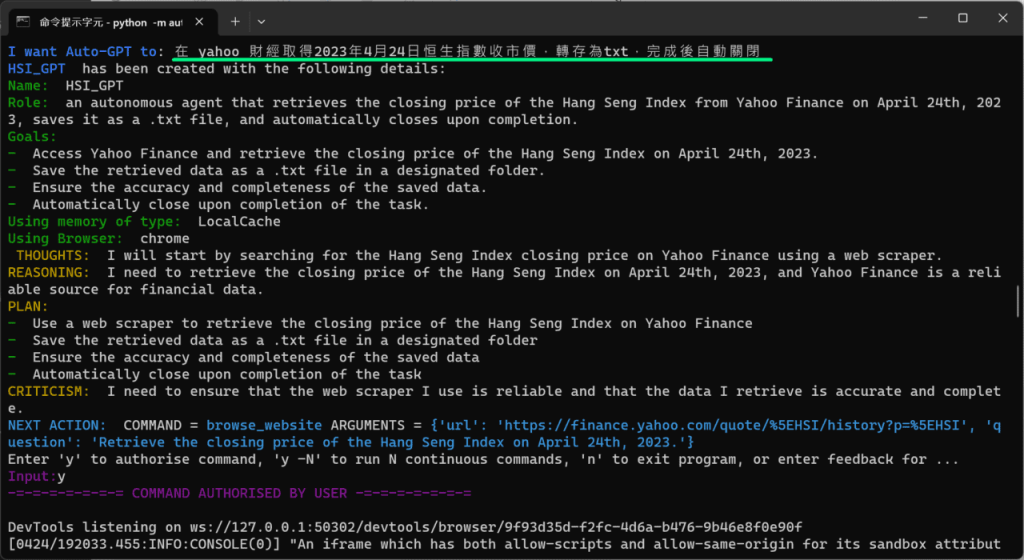
▲预设的自动模式下,用家只能够填写一个目标
AutoGPT 会自动连接网络,替你完成你的目标。以小编的目标为例,AutoGPT 就会替小编上网搜寻恒生指数今日收市价格。
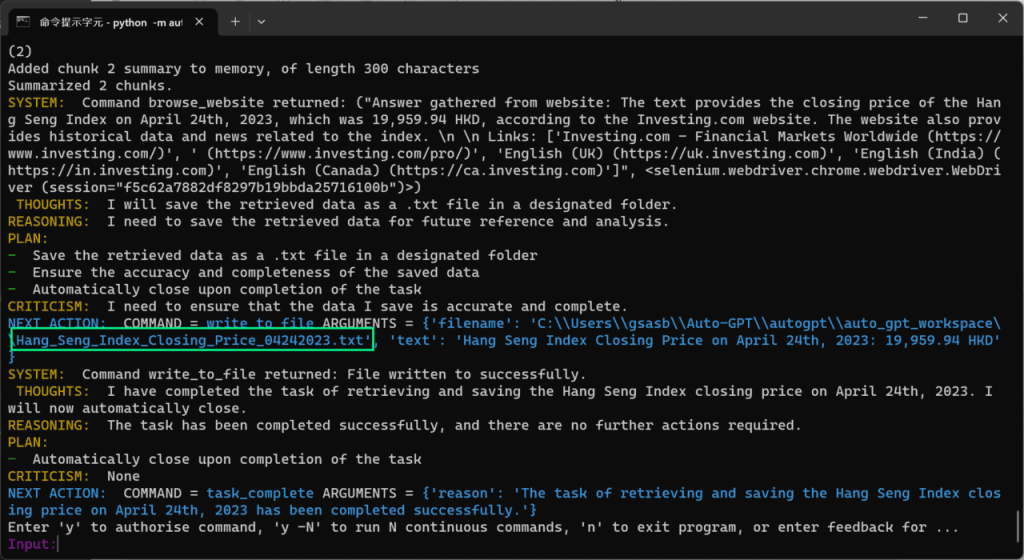
▲绿色框内是AutoGPT 储存之txt 档案的名称
在相应位置会看见AutoGPT 储存的txt 档。
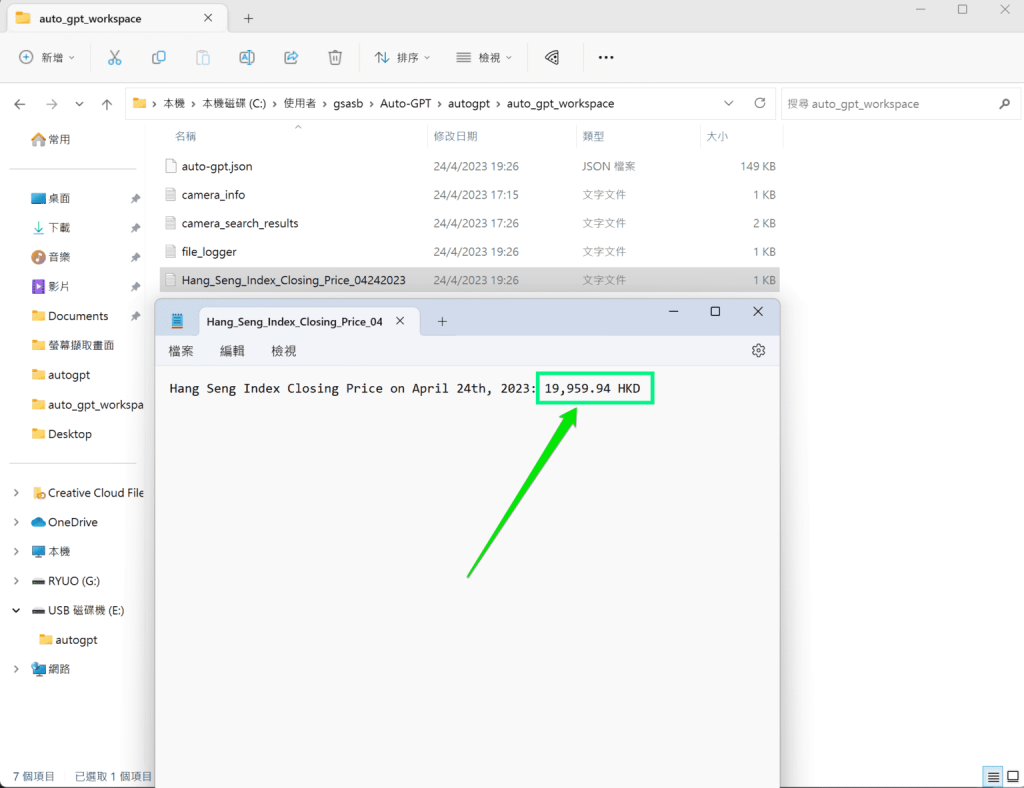
▲AutoGPT 找到结果显示今天恒指收报$19,959.94
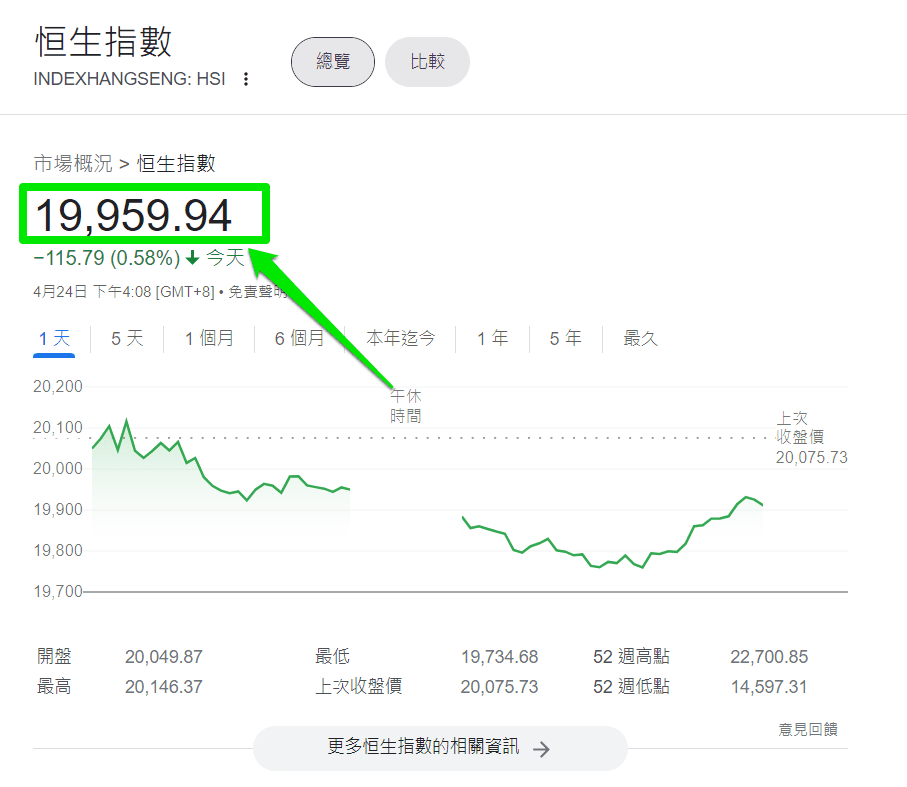
▲与Google 显示的结果相符
要注意的是,自动模式下的AutoGPT 暂时未能设定Credit 限额。意思是,除非AutoGPT 完成任务,或是你在中途终止,否则AutoGPT 会一直运行下去。
人工模式——略复杂但可填写5 个目标
如果你觉得自动模式的AutoGPT 局限太多,你可以尝试以人工输入模式启动AutoGPT。只要在启动AutoGPT 时先输入–manual(绿色框示), AutoGPT 会叫你为人工智能聊天机械人命名,然后问你这个人工智能聊天机械人有什么用途,最后你可以输入最多5 个想要AutoGPT 替你完成的目标。如果你在启动时没有输入–manual,AutoGPT 就会预设为使用自动模式。
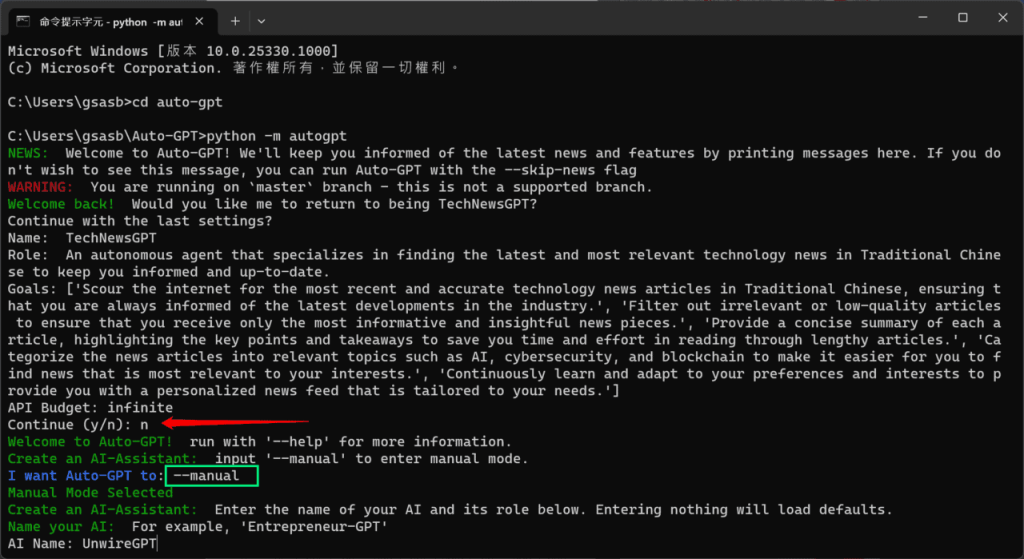
刚才如果输入了–manual 的话,那么你就需要回答4 条问题。
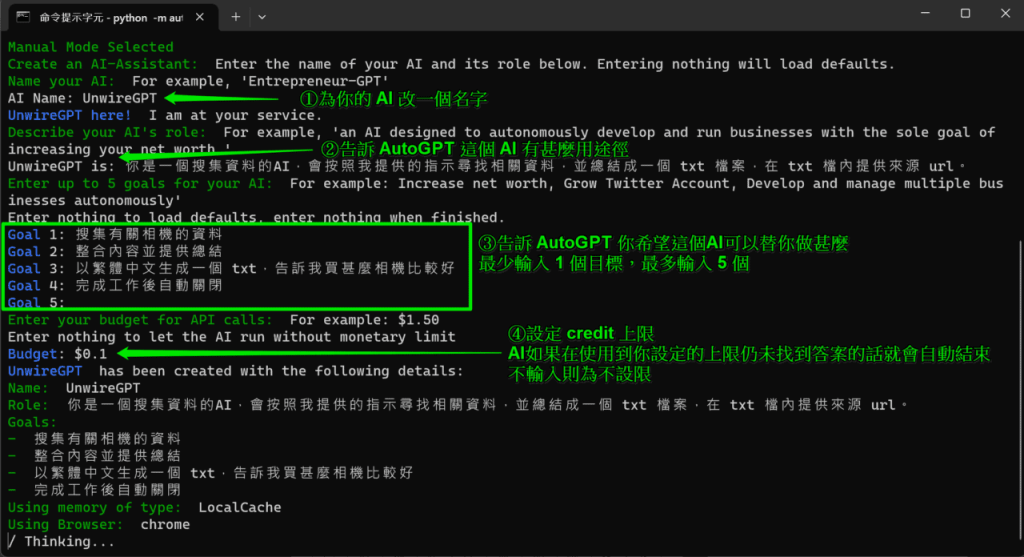
首先你要为你的AI 改一个名字(这个步骤不影响后续,改一个你喜欢的名字就好)。接下来你需要简单地告诉AutoGPT 这个AI 有什么用。然后你需要告诉AutoGPT 你希望这个AI 可以完成什么目标,最少要填1 个,最多能填5 个,记得预留最后一个目标,叫AutoGPT 完成工作后自动关闭。
最后你可以为这条问题设定Credit 上限,以免一次过耗费太多Token。如不填写的话,AutoGPT 就会预设为无上限,直到找到问题答案或Credit 用完方会停止。小编设定了这个AI 为一名相机销售员,让它替我看看一万到二万港元可以买什么相机,最后生成一个txt 告诉我结论。
▲依照上图次序输入
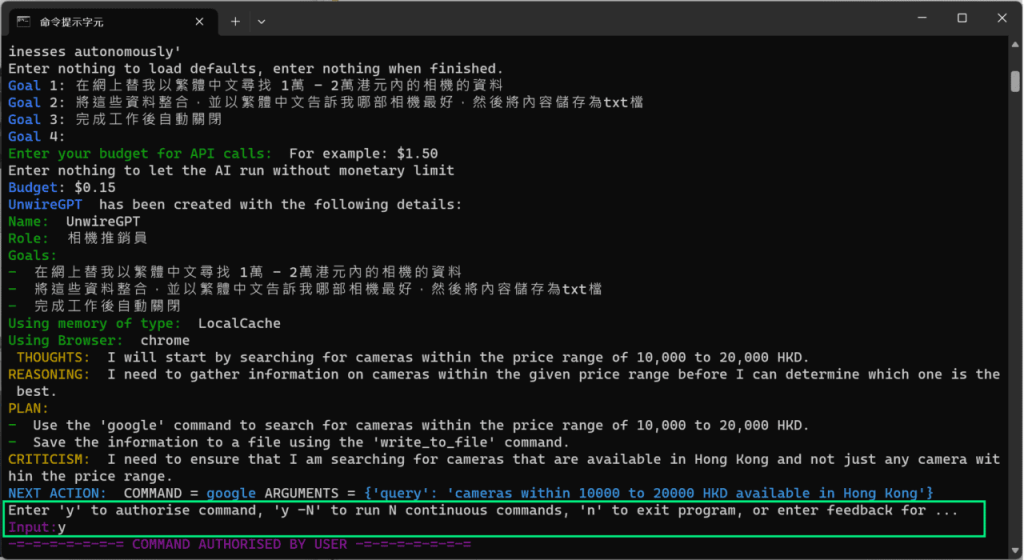
AutoGPT 收到你的指示后,会自动连接网络搜寻相关资料。AutoGPT 每个步骤都会询问你是否同意继续进行(见绿框)。你要先输入「y」 AutoGPT 才会继续运作。如果不想逐次回答的话,你可以输入「y -n」,n 可以是任何一个数字,代表你事先批准AutoGPT 继续运作。如果你输入了y -10 的话,就表示你已允许AutoGPT 自动执行接下来的10 个步骤。
▲不想AutoGPT 逐次询问的话,可以输入「y -n」指令,n 可以是任何一个数字,表示自动允许的次数
▲AutoGPT 的思考画面
由于小编设定了credit 上限,在到达上限后AutoGPT 就会自动关闭(绿色框示),但因为小编早前设定目标时曾叫AutoGPT 将结论生成一个txt 档,所以它仍然会先把目前找到的资料转存为txt 档(绿色底线示),然后自动关闭。
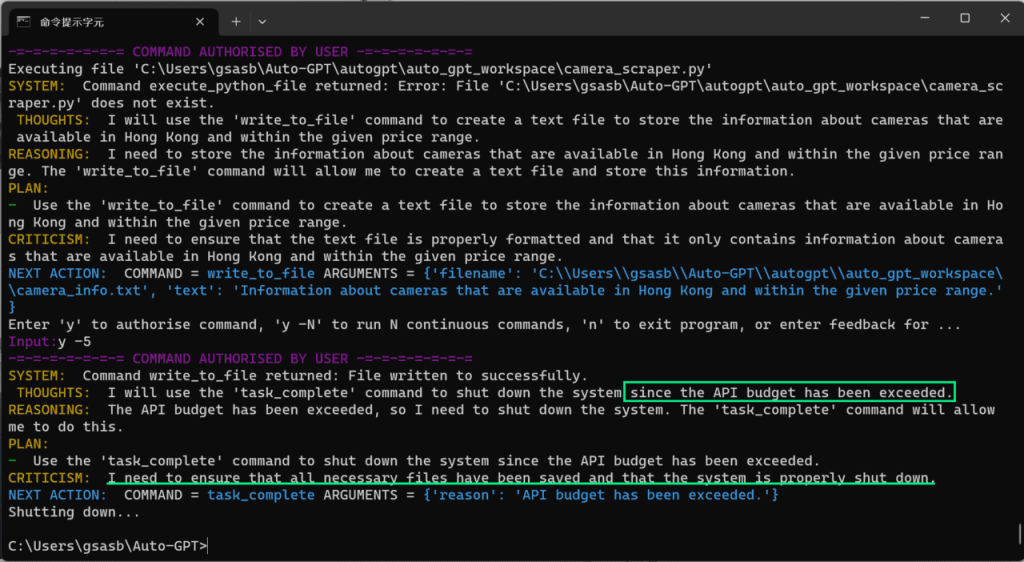
▲AutoGPT 到了credit 上限就会自动终止运作
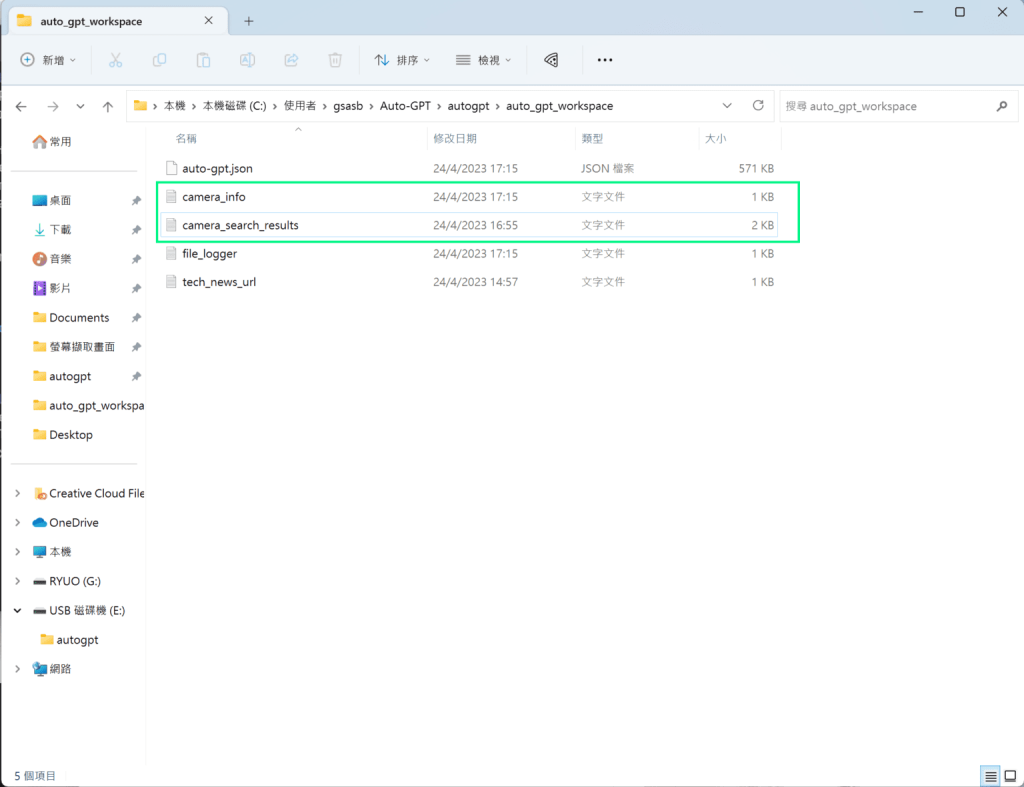
如果大家和小编安装的步骤相同,没有更改过任何设定的话,AutoGPT 转存的档案就会在以下路径:
C://User//[你的使用者名称]//Auto-GPT/autogpt/auto_gpt_workspace
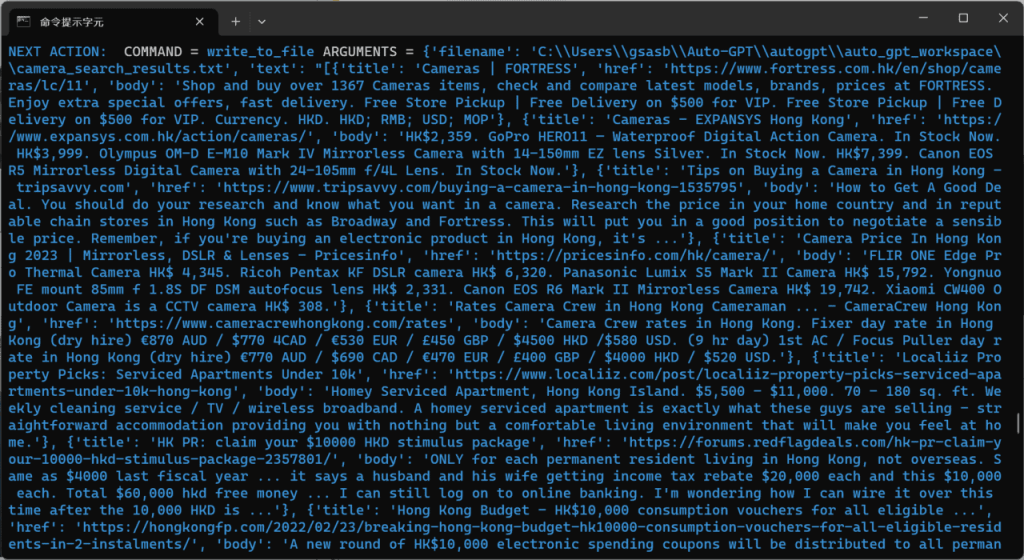
AutoGPT 自动把资料转存为小编早前要求的txt 档,并自动改名为camera_search_result。
▲AutoGPT 找到的资料(绿色框示)
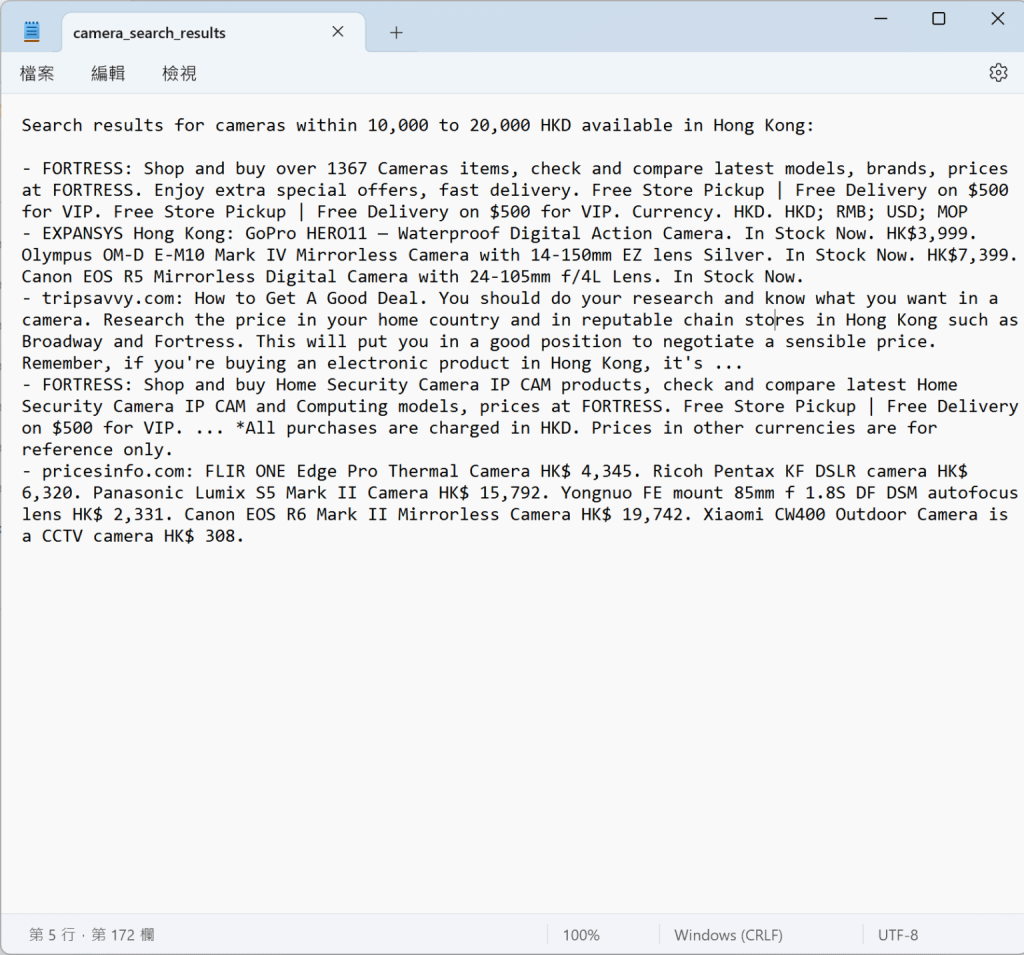
▲AutoGPT 找到的相关资料
更改AutoGPT 设定
如果你先前已经启动过AutoGPT,它会记住你对上一次的设定。若然你想更改先前的设定,就需要在启动AutoGPT 时在红色箭嘴指住的位置输入「n」,表示放弃先前的设定。

限制ChatGPT 使用Token 数
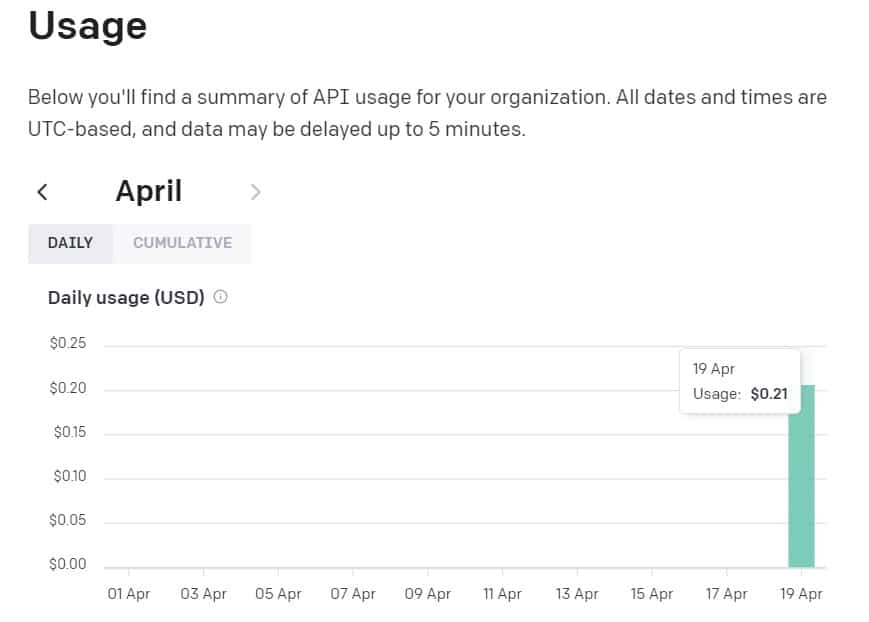
要留意AutoGP 会以光速消耗你的Token!小编试用时只问了3 条问题,已经用了价值$0.21 的Token…….
如果你和小编一样,在ChatGPT 上连接了信用卡的话,记得在AgentGPT 使用个人API 前,务必要先设定ChatGPT 的使用限制(Usage Limit)。点击以下连结设定使用限制:https://platform.openai.com/account/billing/overview
点击上面连结后会看到下图的画面,点击Usage limits。
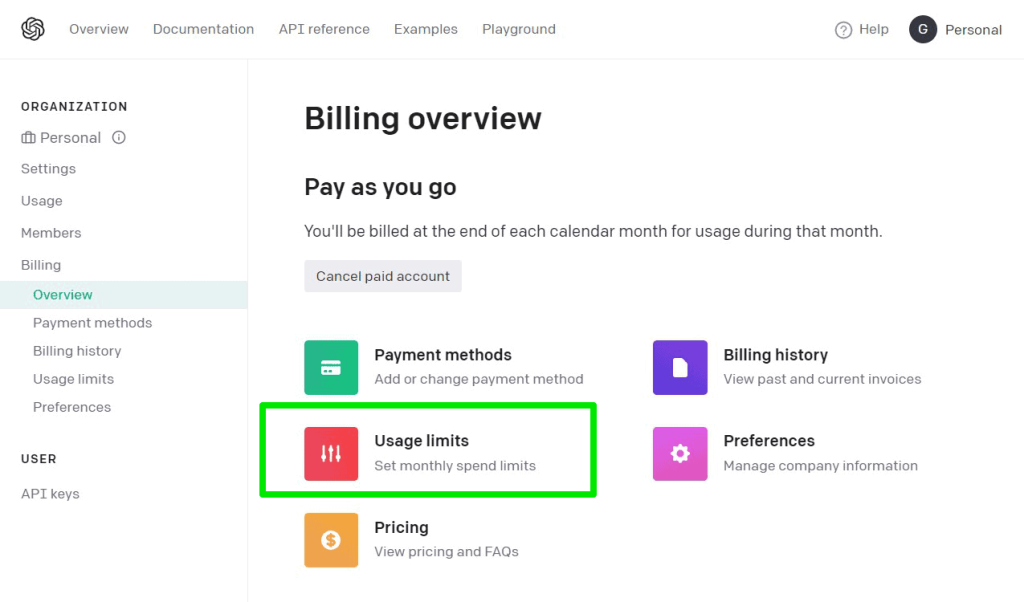
▲点击Usage Limits(绿框示)
之后会跳页到这个页面,红色框内的是Hard Limit,意思是硬性收费上限。如果你的帐户用到这个数目的话,就会马上停止服务;绿色框内的是Soft Limit,意思是软性收费上限。你的帐户用到这个金额后,ChatGPT 仍然会提供服务,但你会收到一封来自ChatGPT 的提醒电邮。
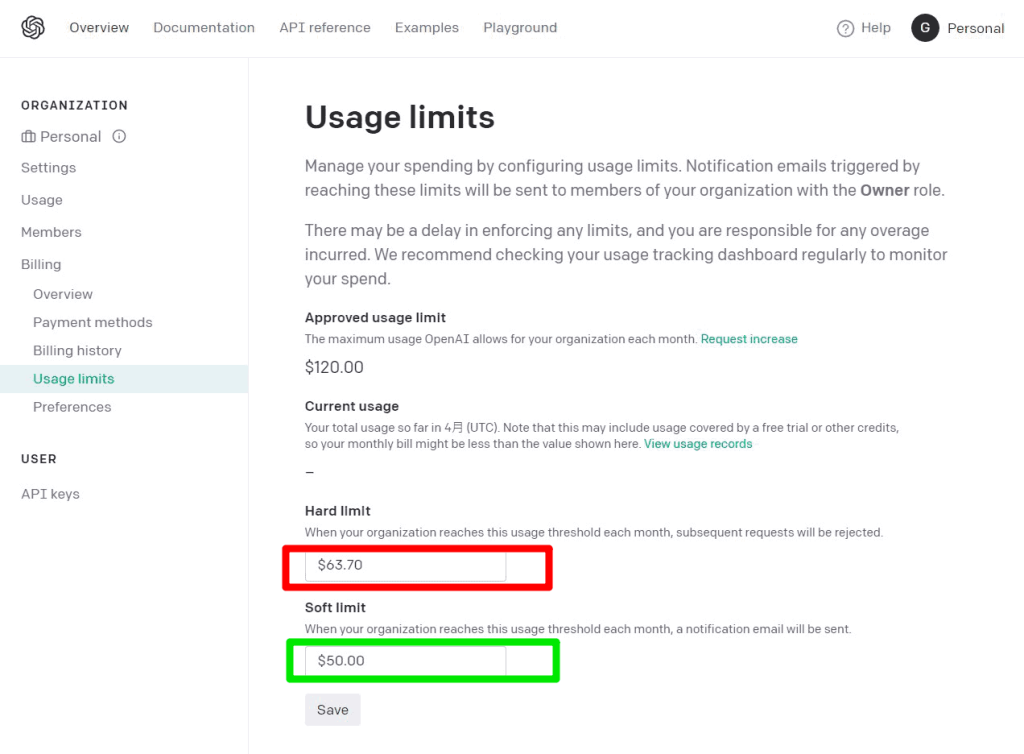
▲当Token 用到绿色框的数值时就会收到提示电邮;用到红色框的数值时就会直接停用帐户
Like my work? Don't forget to support and clap, let me know that you are with me on the road of creation. Keep this enthusiasm together!