【Dragon Boat Festival】Three Steps to Simple Development of NFT Project | Smart Contract Development Plan #8
Three steps: write program → compile code → publish smart contract
In any case, to develop an NFT project, there must be these three steps: write code → compile code → publish smart contracts on the blockchain.
In the previous article, we have successfully uploaded the Metadata of NFT and the image of NFT to IPFS, and then we can use this IPFS URL to start writing the code of the NFT project!
This development is using "Remix", which is an online editing environment used to develop Solidity smart contract programming language. All our program development and deployment code to the blockchain will be operated through Remix, which can be very expensive. Installing the environment on your own computer greatly reduces the threshold for developing smart contracts, and also makes it easier for some novice readers to have the experience of "writing a program for the first time to create a product" when they actually implement it.
But in addition to the Solidity language and the Remix development environment, this time we also introduce a very important smart contract function library called "OpenZeppelin". This set of tools will greatly speed up the development time, and this function library is very important for information security. Parts are always evolving and are safer than writing the code ourselves.
OpenZeppelin
OpenzZeppelin itself is a company, and their main business is probably to provide tools to make it easier for developers to develop and manage smart contracts and to provide audits for smart contract code security. You can see some of them have participated in some well-known projects on the official website. Project development or audit assistance, such as Brave browser, Compound lending platform, the official website URL is: https://openzeppelin.com/
They provide a set of open source and relatively safe smart contract development function libraries for smart contract developers to use. Translated into vernacular, they have created a toolbox and opened it up so that everyone can freely receive this free toolbox. You can use the tools in the toolbox to build your own products. Using OpenZeppelin's toolbox as the foundation for project development, we no longer need to start from the wheels when we want to build a car. Is it a Buddha Heart Company?
The full code URL for their kit is: https://github.com/OpenZeppelin/openzeppelin-contracts/
The original code of this oversized bag family number can be roughly divided into the following functions:
1. Access control: Who owns the smart contract or the entire system and can operate it.
2. Token: Mint your own tokens and NFTs. Currently, it seems to provide a total of five standards, including token standards (ERC-20, ERC-777), NFT standards (ERC-721, ERC-1155) and NFT taxation Standard (ERC-2981), if you use it directly, the interfaces specified in the official documents have been built, and we don't need to deal with it any more.
3. Gas Station Network: Allow users to interact with our smart contracts without paying for themselves.
4. Utilities: Some general tools, such as mathematical variables that can avoid overflow, digital signature verification, payment systems without trust mechanisms, etc.
It is easy to use OpenZeppelin's tools without downloading them. You can directly import the tools you want to use on Remix. The code below will be introduced.
Initial settings for Remix
Open Remix for development, URL: https://remix.ethereum.org/
As for the browser part, you will need to use a browser with the Metamask wallet or other wallet extensions installed. If your Metamask is installed on Chrome, use Chrome to develop it, because when we will send the smart contract to the test network later , the test coins in it are needed to pay the on-chain handling fee.
When you open it for the first time, it may pop up a small window and display "Help us to improve Remix", depending on whether you agree or not, which means that when some exceptions occur in the program, the current situation will be reported to the Ethereum Foundation. Developers, help them find problems and optimize the system.
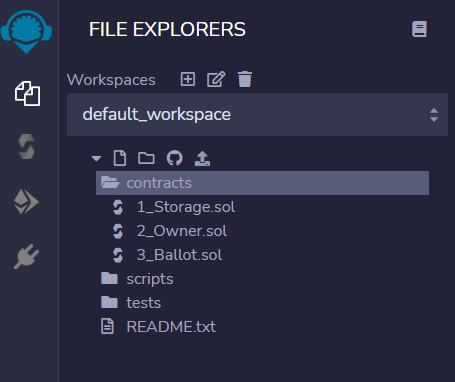
Just like using a general file manager, we first click on the contracts folder, click the paper icon folded in the upper corner, and create a new .sol file in the contracts folder, such as abcd.sol, NFT1155.sol, . sol is the extension of the solidity programming language.
Quickly develop your first NFT program project with OpenZeppelin
Since the NFT of the ERC-1155 protocol will be issued this time, I will name the file Basic-1155.sol . You can also choose a name you like, but the extension must be .sol.
The first NFT project will write the simplest piece of code, import it into OpenZeppelin, and then try to compile and publish the smart contract on the local side. If it can be published, it means success.
Basic-1155.sol
 // SPDX-License-Identifier: MIT
pragma solidity >=0.8.0 <0.9.0;
import "@openzeppelin/contracts/token/ERC1155/ERC1155.sol";

contract Basic_1155 is ERC1155 {
    constructor() ERC1155("ipfs://QmdnBQrQa6KXVeeNr7fpc9uxQLtcCyknjcWqLXtoG1ahTK") {}
}
At the beginning of the first line, we need to give a "SPDX" license symbol, which means whether this code should be open source and licensed to others, and the degree of open source is related to different licenses, "// SPDX-License- Identifier: MIT" stands for MIT open source license; "// SPDX-License-Identifier: unlicensing" stands for not open source, if you want to use other different licenses, you can go to SPDX to see the details.
The second line of pragma solidity is to specify the version of solidity. In this article, we set the version number to 0.8.x, and the compiler will use the latest version of Solidity 0.8.14. Since Solidity is still a very frequently updated programming language, If you see this article in the future, there is already an updated version of Solidity, and you find that there is a problem with the code, you may try to downgrade the version back to 0.8.14 and run it again.
Then the third line of import means to import OpenZeppelin's toolbox ERC1155.sol, so that our code below can use it.
The following contract is the protagonist smart contract, Basic_1155 is the name I named myself, and is ERC1155 is the ERC1155 developed by OpenZeppelin. The purpose of the constructor in the contract is the place that will be executed first when the smart contract is deployed for the first time, and can only be used by Execute once, so in my understanding, the constructor is a concept of setting the initial parameters of the program, and then you need to fill in a URI field required by NFT, that is, put the .json file we published on IPFS in the previous article. Corresponding to the IPFS URL, I still remember that I made a picture at the end of the previous article:
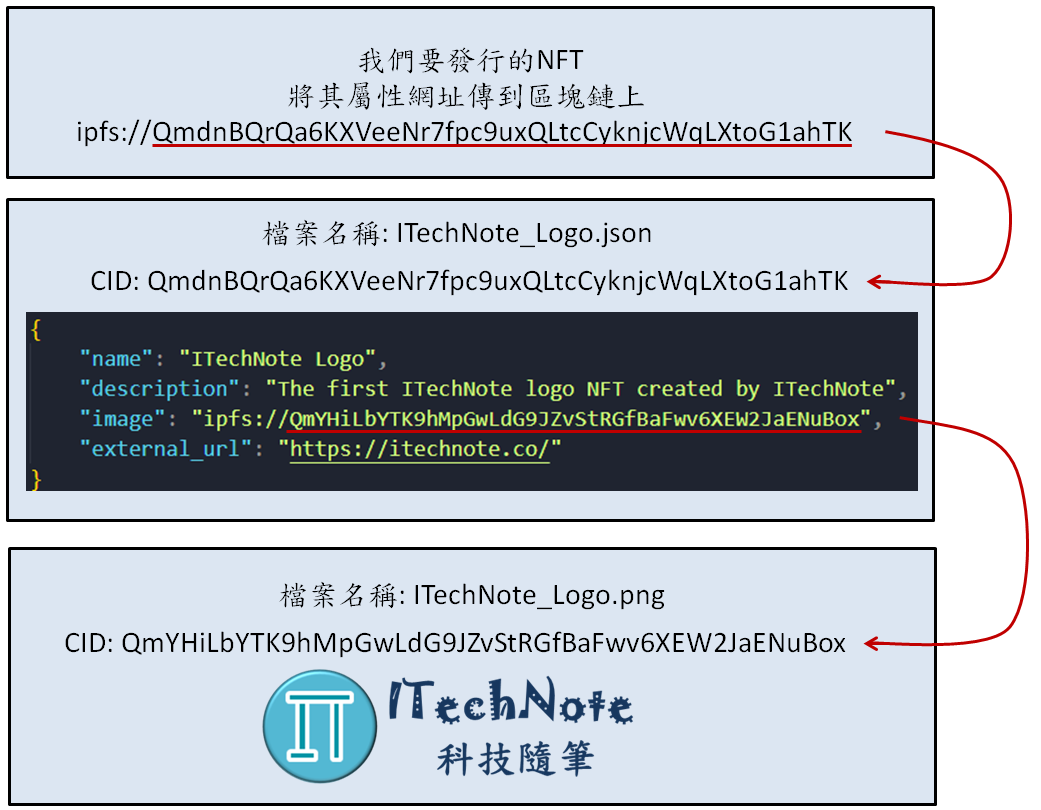
That is to say, when the NFT display tries to display the appearance of this NFT, it will first connect to the .json file on IPFS through the URI URL we set here, and find the image when parsing the Metadata under the .json file. field, and then link to the real image through the IPFS URL in the image field to fully display the NFT.
Compile and publish smart contracts
After the program is written, it needs to compile and publish the smart contract to the blockchain. We spent a lot of space explaining the actions of compiling and publishing and the subtleties in [New Year's Plan] Life's First Fortune Coin | Smart Contract Development Plan #2 The settings are briefly introduced here. I have framed a few points to pay attention to in red circles.
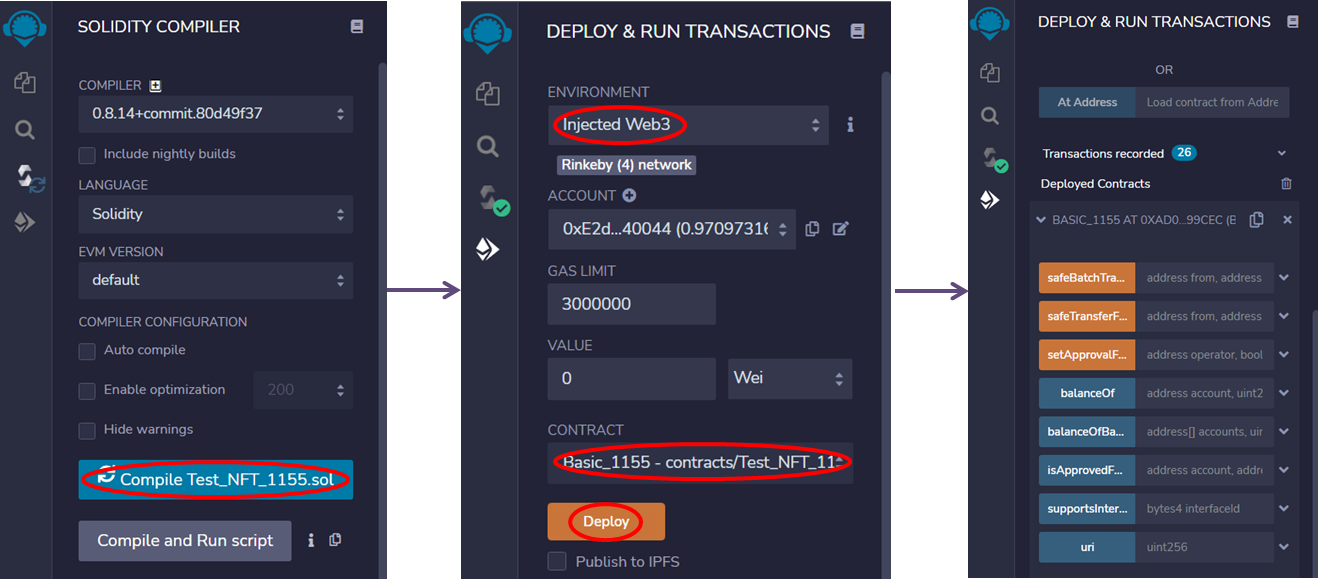
The first picture on the far left is compiling, select the .sol file to be compiled by the COMPILER version, and see that it becomes a green tick.
The second picture in the middle is for release. First, switch ENVIRONMENT to "Injected Web3", and switch Metamask to the Rinkeby test network used this time. Remember to change CONTRACT to the contract to be released. If you use my code, "Basic_1155" should be selected here. Since we used OpenZeppelin this time, there will be more choices. Don't make a mistake. Then press the Deploy wallet and it will pop up to ask you to confirm the transaction. After confirming the transaction, it is necessary to upload anything to the blockchain. It will take a while, wait until you see the third picture.
Even if it is released on the test network, as long as you operate on the blockchain, you will need to pay gas fees. If you don't have ETH, you must first receive free Rinkeby ETH. The website is: https://faucets.chain.link/rinkeby
If you see these things in the third picture on the far right, it means that you have successfully completed and released the first NFT project, oh, but it can't do anything now, and there is no NFT that can be minted yet function, let's continue to rewrite it.
Ownable smart contracts (Owner and ownable)
These tokens or NFT digital assets we create on the blockchain are like banknotes, coins, and real estate in real life. It is very intuitive that they can be owned as independent assets of individuals. And the smart contract itself can also be attributed to someone's wallet!
The smart contract is like a vending machine on the roadside, what data needs to be input (investing money, selecting the product button), what result will be produced (dropping out the drink), the programming will make the vending machine The functions are different. In addition to these similarities, smart contracts can be owned like vending machines. Only the owner has permission to set or modify some parameters. The smart contract that can be owned is called "Ownable". The owner is called "Ownable". as "Owner".
Then we will directly rewrite the Basic-1155.sol just now, add Ownable so that the smart contract can be owned, and add a function named setURI, so that the owner of the smart contract can set a new URL.
Ownable-1155.sol
 // SPDX-License-Identifier: MIT
pragma solidity >=0.8.0 <0.9.0;
import "@openzeppelin/contracts/token/ERC1155/ERC1155.sol";
import "@openzeppelin/contracts/access/Ownable.sol";

contract Ownable_1155 is ERC1155, Ownable {
    constructor() ERC1155("ipfs://QmdnBQrQa6KXVeeNr7fpc9uxQLtcCyknjcWqLXtoG1ahTK") {}

function setURI(string memory newuri) public onlyOwner {
        _setURI(newuri);
    }
}
The Ownable tool provided by OpenZeppelin is used here, so you need to add a line of import to import the tool.
The second place to be modified is on the right side of the contract, rename the original Basic_1155 to Ownable_1155 to avoid confusion, and add ", Ownable" to indicate that this contract should inherit both ERC1155 and Ownable developed by OpenZeppelin.
There is a newuri in the function setURI, that is, when calling the setURI function of a smart contract in the future, a URL parameter needs to be substituted. This URL parameter will be set to the new URL of the NFT, so the same NFT may have different URLs after setting. Picture appearance.
The setURI function must also be set so that only the owner of the smart contract can change it, otherwise it will be very bad for any passerby on the road to set the URL of our NFT. The setting method is also very simple. Add onlyOwner directly to the right of the function. That's it.
_setURI is the interface we import ERC1155 from OpenZeppelin, call it and throw a string of URLs to it to reset the NFT's URL.
Test and get to know Ownable
After the program is modified, it is the same as before, recompiling and publishing a new smart contract. Here we are going to actually test what is called a "smart contract that can be owned". After some exploration, we will definitely understand it better.
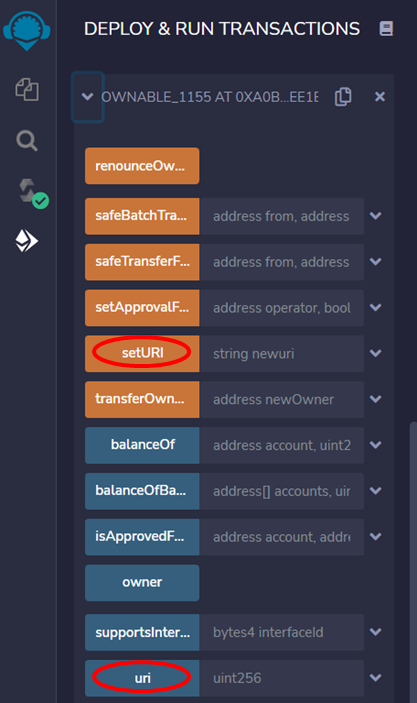
After the release is successful, click on the OWNABLE_1155 smart contract and you will see a lot of things. The orange square is the transaction that needs to be executed on the blockchain, and the gas fee needs to be paid, and the blue one can directly obtain the corresponding data. Block, this time we wrote a setURI function, let it be onlyOwner, which means that only the owner of the contract can use the setURI function, let's try it now!
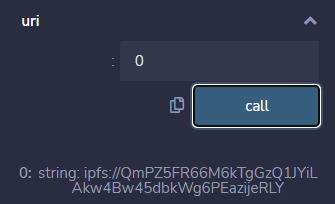
Use the blue button "uri" once, and then press the "call" button to use it. The result of the operation will be the ipfs URL below, which is the URL we gave when we first created the ERC1155.
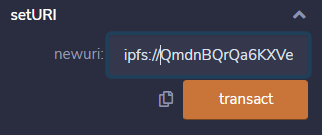
Then use the orange button "setURI" above, and type another URL in the "newuri" field. This URL will be the new look of the NFT, and then press "transact" to put the transaction on the chain.
After waiting for the transaction to be on the chain, we checked the blue button "uri" again, and found that the URL has been changed to the new URL just entered.
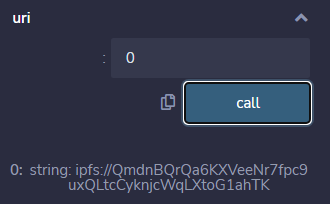
This can only know that the setURI we wrote can work normally! How to prove that only the owner of the smart contract can use the setURI function?
At this time, it is necessary to go back to Metamask to switch to a different wallet, reconnect to Remix, and then use the new wallet to try to use the setURI function, the following error will occur. The content of the error is that "setURI" is intended to be used. The wallet address of the function is not the owner of this smart contract, so it cannot be used.
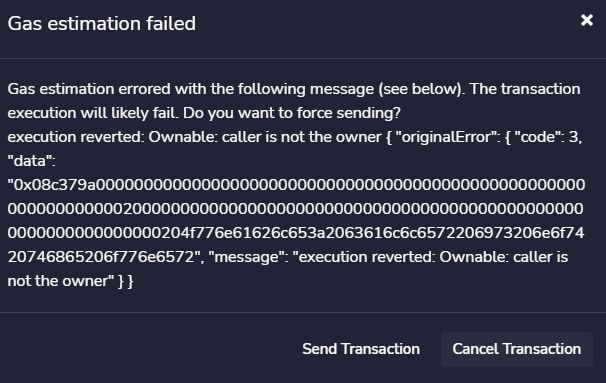
After understanding the general working principle of Ownable, it will become more flexible when developing programs in the future. We can design which functions are for users and which functions can be used by ourselves, but after all, the blockchain requires It is the concept of decentralization. When our project uses more onlyOwner things, it means that the person in charge of the project can change more things privately, which may make users start to have doubts about whether the project is over-centralized.
Finally, I would like to add something that I think is quite important. There is also a "renounceOwnership" function in Ownable. Its function is to release the owner role of all smart contracts. Only the owner of the contract can execute it. After the execution of this smart contract There is no owner anymore, and those functions that use onlyOwner will not be able to change it, so if the project settings are all correct, it will not be changed in the future, you can use renounceOwnership to make your project more decentralized .
Epilogue
You may find that there is no shadow of an NFT now, what are you doing... But considering the space issue, I want to put the most important part of NFT production and casting in the next article, this article mainly Focus on how to use the toolbox called "OpenZeppelin", and some basic parts of compiling and publishing smart contracts after writing the code.
In short, I wish everyone a healthy Dragon Boat Festival. For readers who have filled out the NFT collection form before, I will send the Dragon Boat Festival NFT as soon as possible, and then you will see the assets on Polygon!
The complete code link of this article: https://github.com/ITechNote/DragonBoatNFT
Further reading
List of Smart Contract Development Program Directory: https://itechnote.co/sc/
Finally, thank you for taking the time out of your busy schedule to read my articles. If you still like these content, I hope to get your follow-up and small sponsorship support, which will give me more motivation to continue writing. EVM compatible wallet The address is 0xae1dd06d57f582999a9c50b86ba913eecd7155ce.
You are also welcome to click this link to find me on other platforms .
See you next time o((>ω< ))o~
Original link ITechNote technology essay
Like my work? Don't forget to support and clap, let me know that you are with me on the road of creation. Keep this enthusiasm together!


- Author
- More