【Christmas Drawing Flash】Use CSP to draw a Christmas card! Attach the basic application of layers and materials! draft

foreword
It's Christmas again, I wish you all a Merry Christmas! I just finished this tutorial at work, and happened to meet @林宇's Christmas painting flash | Painting for festive NFT! (There is free NFT in it) , so I decided to post this article on Matters, by the way Participate in activities. However, because Ben Xiong is not collecting NFTs in particular, I would like to have LikeCoin this time, thank you for hosting! Although maybe in the near future, Ben Xiong will also organize and deal with NFT matters for himself...
Speaking of which, in addition to painting, painters now need to know how to cut films and write copywriting, which really makes the workplace very sweaty. Before deciphering the soul fragments, Ben Xiong really didn't think that after the "Ten Weathering Children" event, Ben Xiong completed a normal-scale electric drawing by himself within three weeks ( reviewing the normal-scale works of Ben Xiong before dismantling ), Also edited the process into a video and wrote a teaching article. After deciphering the fragments, even the usage and range of the head, eyes, limbs, etc. have become different. Come on, everyone... Break it down... Maybe you will find yourself more "normal" than you think.
Back to the topic. Facing Christmas at the end of December, the beginning of December is definitely a good time to make Christmas cards, so this time Ben Xiong decided to start with drawing Christmas cards and explain the basic application methods of CSP layers and materials. The full article has been logged on Clip Studio Tips and Youtube . If you are interested, you can have a sneak peek. If you like it, you can clap and reward.
create file
Christmas cards are generally postcard-sized. If you want to facilitate printing, then A6 will be a more suitable size, so when drawing, you can also directly use A6 canvas for drawing.
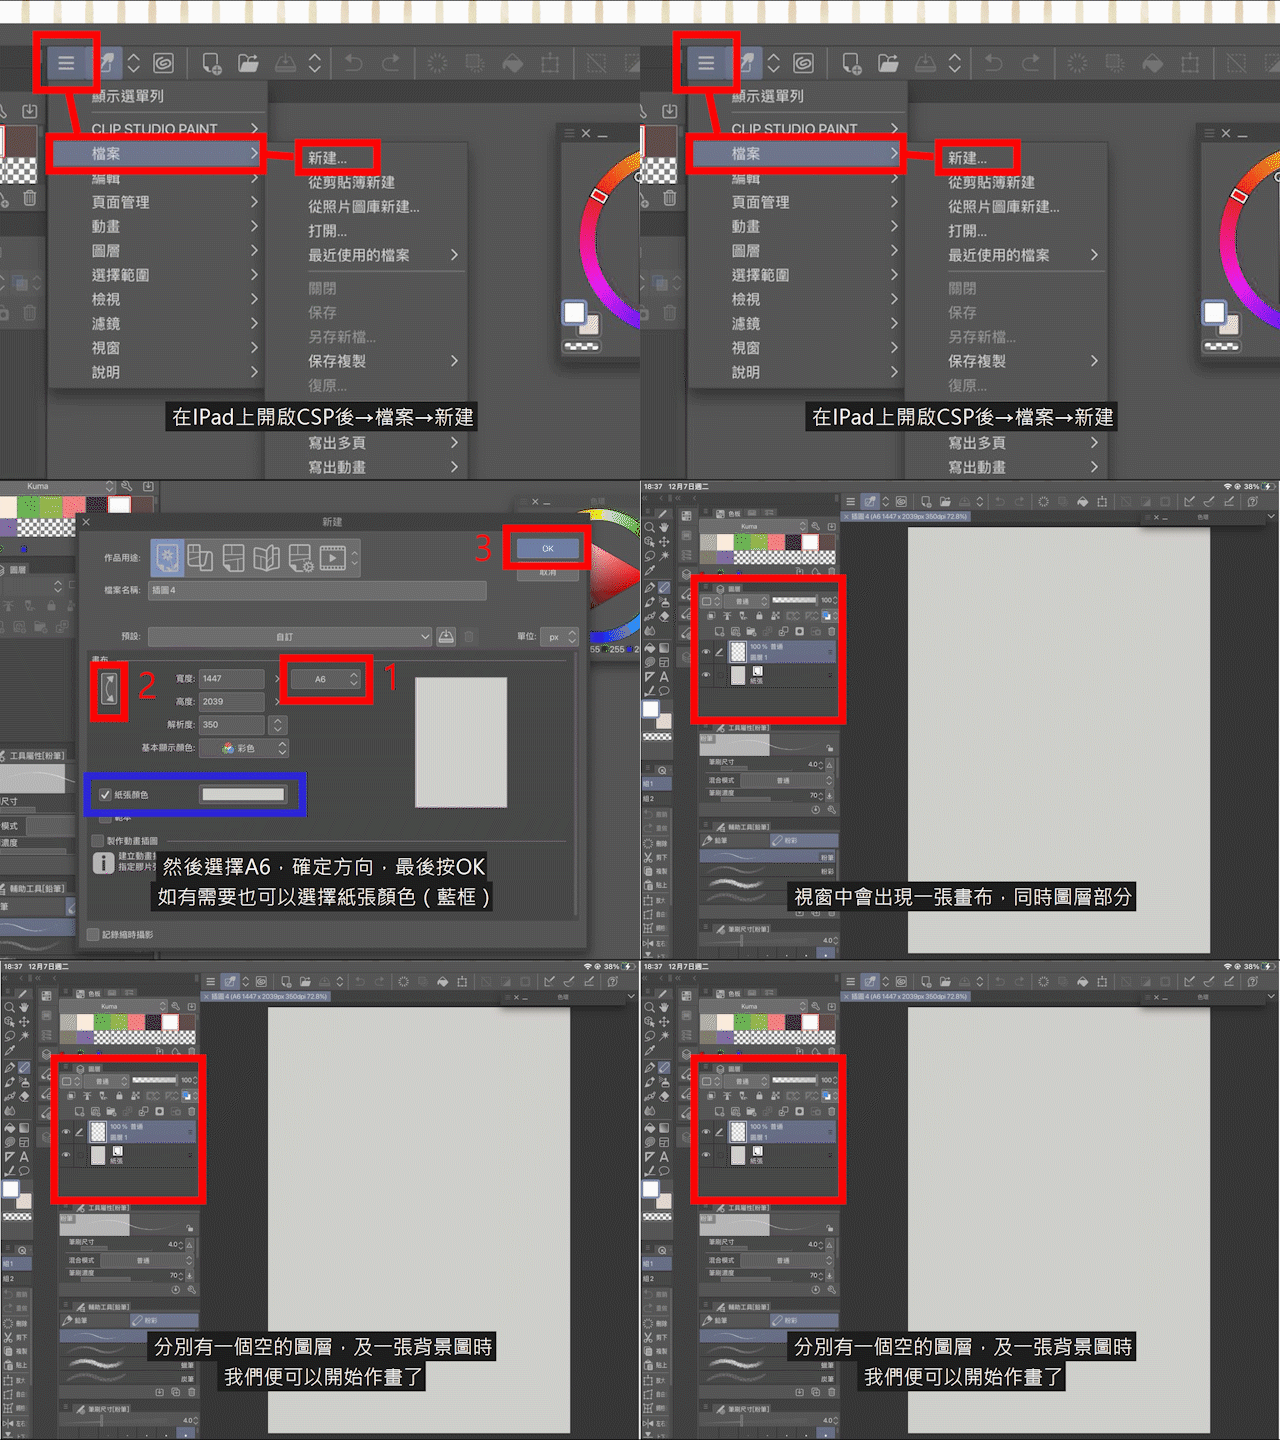
After opening CSP on the iPad → File → New, then select "A6", confirm the direction, and finally press OK. The paper color can also be selected if desired.
When a canvas will appear in the window, and there are an empty layer and a background image in the layers section, we can start painting.
What I want to accomplish this time is the following Christmas card, which will be explained from the draft part first.
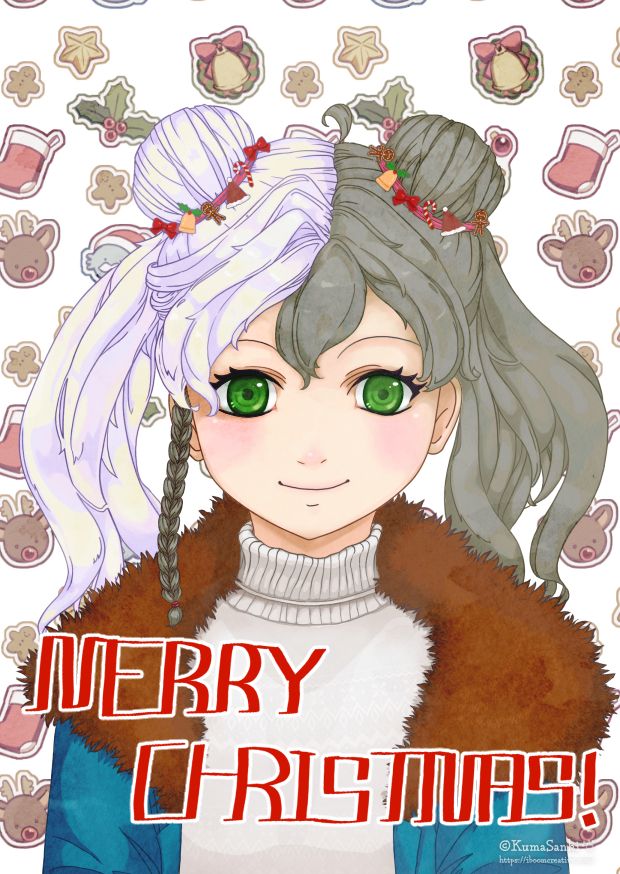
Part 1 Draft
|In order to check the skeleton, first know the "left and right inversion"
I personally think that in CSP, the most commonly used functions in the draft stage are "left and right inversion" and "script layer". "Invert Left and Right" can quickly flip the entire canvas to the left and right, which is very suitable for examining skeletons. But it should be noted that the temporary "left and right inversion" used in painting is different from the "left and right inversion" of the entire work.
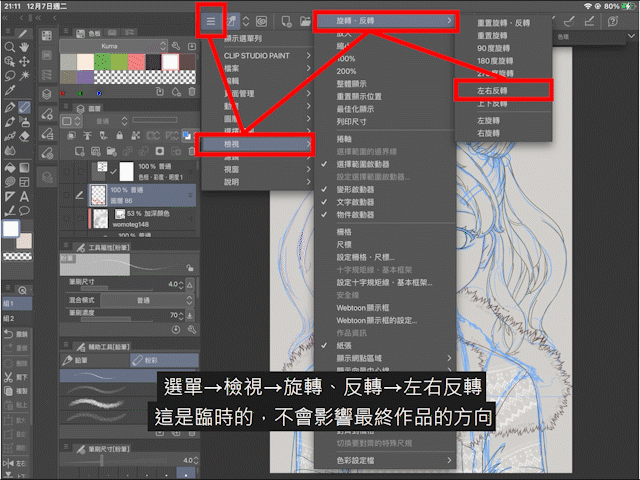
Menu → View → Rotate, Invert → Left and Right Invert This is a temporary "left and right inversion" function, which will not affect the orientation of the final work.
Menu → Edit → Rotate, Invert Canvas → Invert Left and Right This is long term and will affect the orientation of the final work. Regular use will also drain the iPad's temporary memory and distort the file, so don't make a mistake.
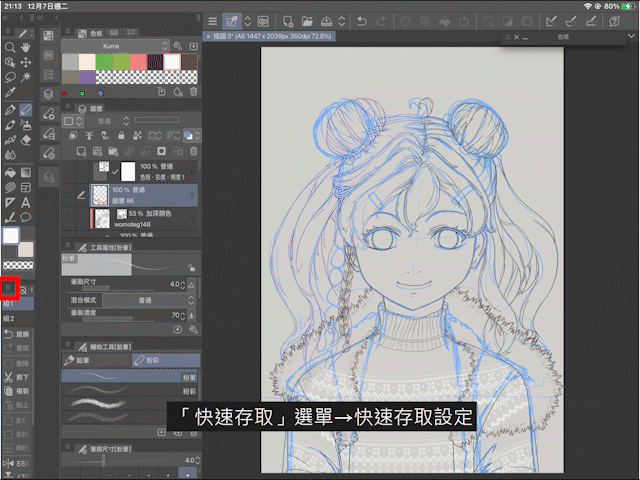
If you want to use "left and right inversion" quickly, you can use the quick access function.
Go to "Quick Access" menu → Quick Access Settings → View → Rotate, Invert → Invert Left and Right → Add
|In order to facilitate the organization, new layers and layer folders have been added
Proper use of layers can not only facilitate editing, but also help speed up painting.
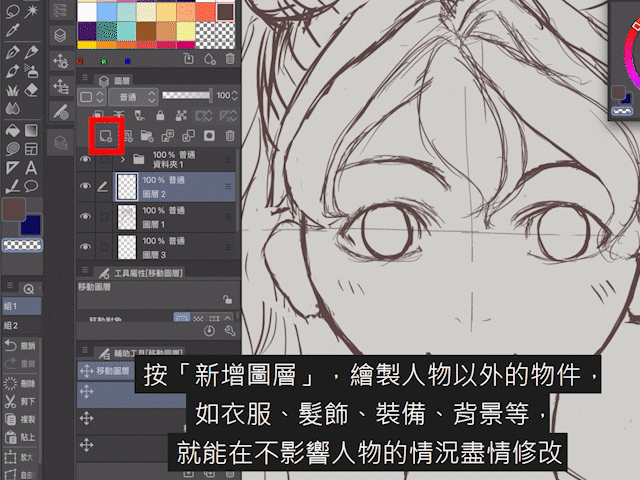
Click "Add Layer".
Objects other than characters, such as clothes, hair accessories, equipment, backgrounds, etc., can be modified without affecting the characters. At the same time, after drawing a lot of layers, if you want to organize them well, you can select all related layers and add them to the folder.
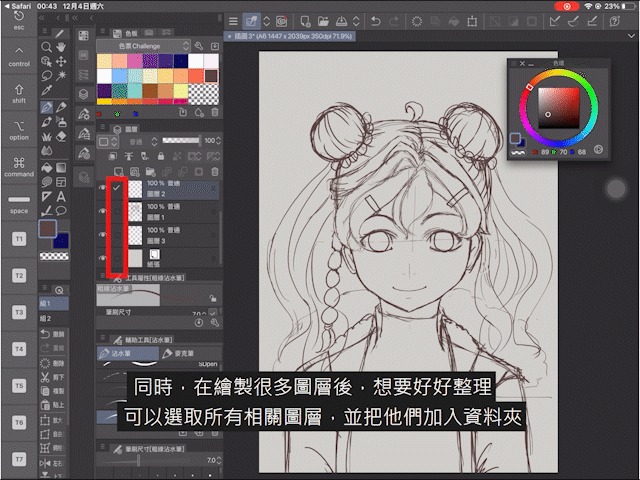
On the selected layer → iPencil or fingertip long press → create a folder and insert a layer The selected layer will be added to a new folder for easy organization.
Another way to add a folder is to click the "Add Folder" button.
Press Add Layer in the new folder, the layer will be automatically included in the relevant folder.
|When outputting, please do not see the draft! Introduction to "Drawing Layers"
Next is the introduction of the "prototype layer".
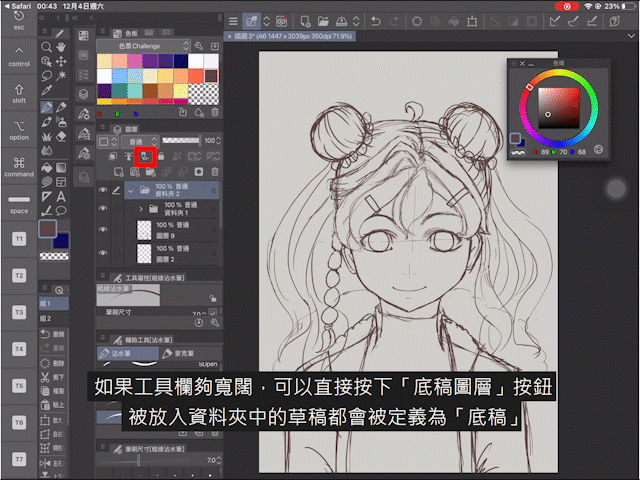
If the toolbar is wide enough, you can directly press the "Drawing Layer" button, and the drafts placed in the folder will be defined as "Drawings". After selecting the draft, the color of the draft will not be changed, but when exporting the file, you can choose whether to output the "script" or not.
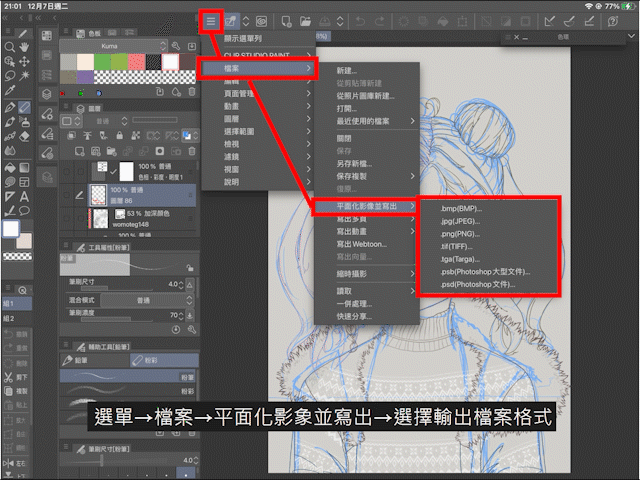
Menu→File→Flatten image and write out→Select output file format to choose whether to output "script", after selecting, press OK to output the file.
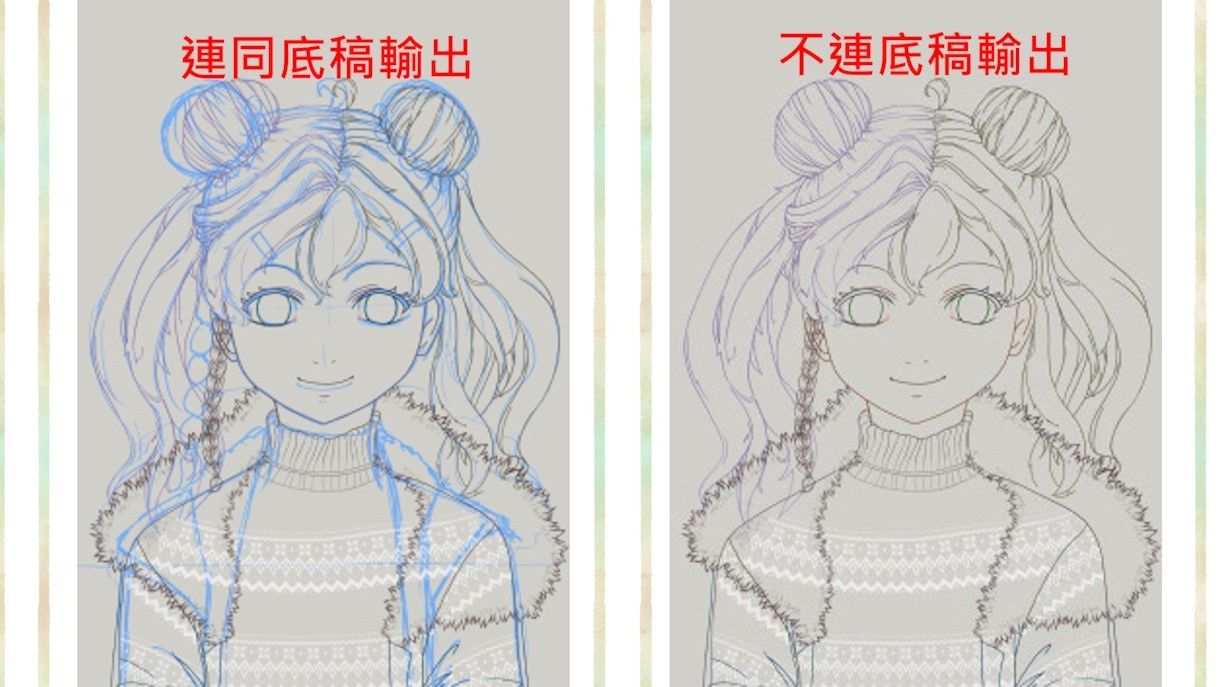
In the example above, the image on the left is the output script (blue line), and the image on the right has no output script.
It is worth mentioning that if the toolbar is not wide enough, the shortcut key of "Drawing Layer" may be hidden. At this time, you can go to "Menu→Layer→Set Layer→Set as Script Layer".
| Convert the color and transparency of the entire layer!
So, how to quickly convert all the manuscripts in the folder?
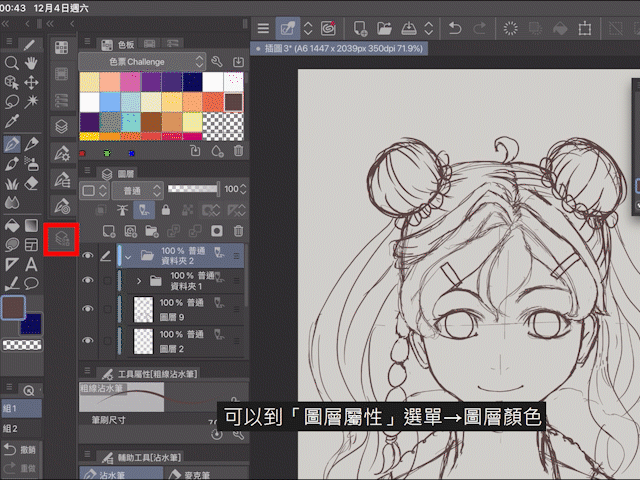
You can go to the "Layer Properties" menu → Layer Color where you can convert the lines of the entire layer to a specific color.
In addition, if the toolbar is wide enough, you can also find shortcut keys for quick "Layer Color".
After changing the color of the manuscript, it may not be able to cover the line art clearly. At this time, you can adjust the opacity of the layer to achieve the effect. The opacity of 40-60% will be a good choice, please do as needed. Adjust it.
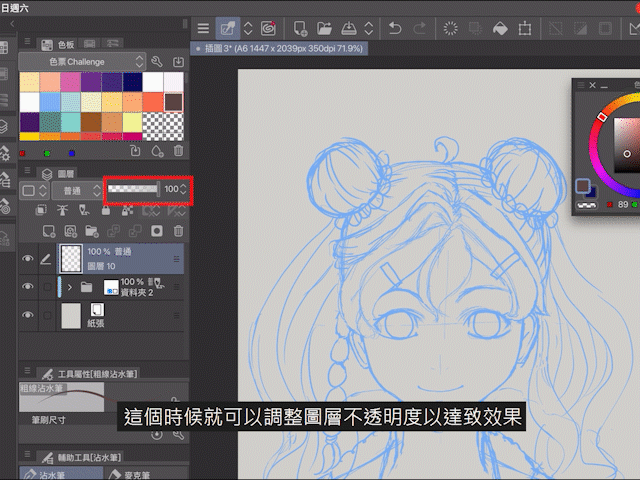
The draft is over here! The line draft, coloring, and final adjustment and material application will be updated later. Welcome to follow Ben Xiong and @birdye for the latest updates.
In the end, I refused the draft and accepted the commission. Ben Xiong really didn't like the word "request".
If you want to support our work, you can:
Join the journey of deciphering fragments: [Advertising Time] Digital Reasoning | Past Life Interpretation- Deep Soul Decoding Remote Consultation
Like Facebook Page: I-Boom Creation House
Commission design, typography, illustration, etc.: https://iboomcreative.com
Buy us a coffee: https://ko-fi.com/iboomcreative
Paypal reward: https://www.paypal.me/iboomcreative
Like my work? Don't forget to support and clap, let me know that you are with me on the road of creation. Keep this enthusiasm together!


- Author
- More