[Final Chapter of New Year's Plan] The Great Harvest Leek Coin | Smart Contract Development Plan #4

foreword
This is the fourth part of the special plan for the new year. Our goal is to learn to write our first smart contract and issue our own cryptocurrency before the new year. It can be sent as a red envelope to relatives and friends, or think about the use of our currency and create An economic model of currency, you can make a lot of money by cutting leeks, so if you haven't read one, the link to the first one is here .
After the previous article, we have written the code and successfully released our smart contract. The released contract will send 100% of the Canadian currency supply to our wallet, but this is all done on the local machine. Change the browser or delete the smart contract, and it will be gone, so in this article, we will double-click to make the smart contract subordinate to the Ethereum test network. Although the money on the test network is fake, it It is still a functioning blockchain. Whether you change your browser, change your computer, or use it in another country, the coins we issue will remain on the blockchain forever!
We will also discuss why we post the code on Etherscan and verify it after the contract is published, and what are the benefits of doing so.
Let’s get started. Although I wrote in the first article how to receive ETH on the test network as a fee for issuing smart contracts and transferring funds, I will write it again here.
Free Ether Claim on the Ethereum Kovan Testnet
First of all you need to have a Metamask wallet at https://metamask.io/ .
Two steps for Metamask to switch to the Kovan testnet:

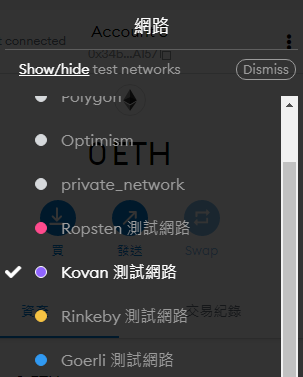
**If the Kovan test network does not appear in your wallet, please add the Kovan test network to Metamask first. The same is done in two steps:
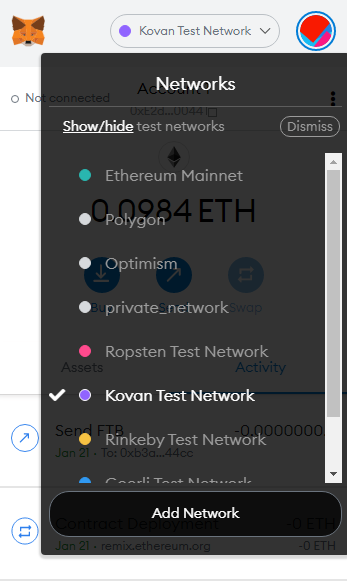
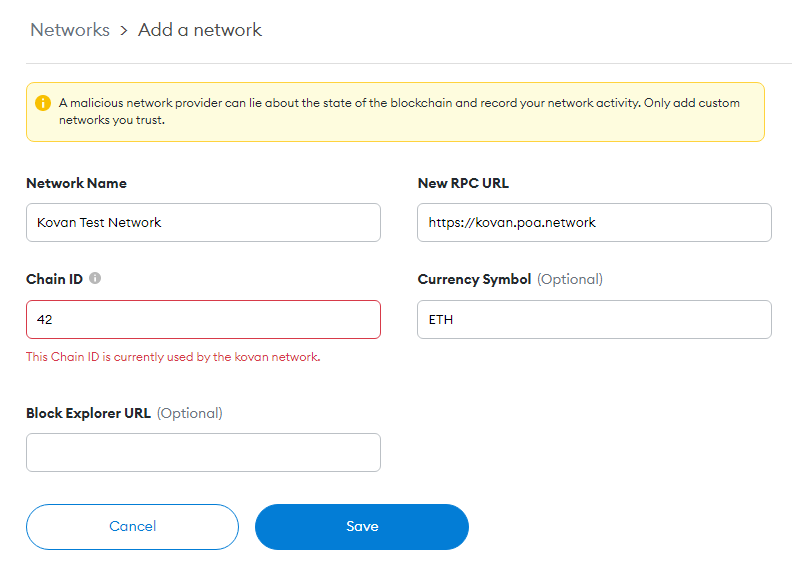
In order to facilitate copying and avoid input errors, the four items will be written down here, which can be copied and pasted directly from here:
Network Name: Kovan Test Network
New RPC URL: https://kovan.poa.network
Chain ID: 42
Currency Symbol: ETH
After adding, remember to go back and do the two steps to switch to the Kovan test network, first switch the wallet to the Kovan test network!
Then, copy your wallet address, and we go to the faucet to collect money! The URL is https://linkfaucet.protofire.io/kovan , and the page will look like this after opening:
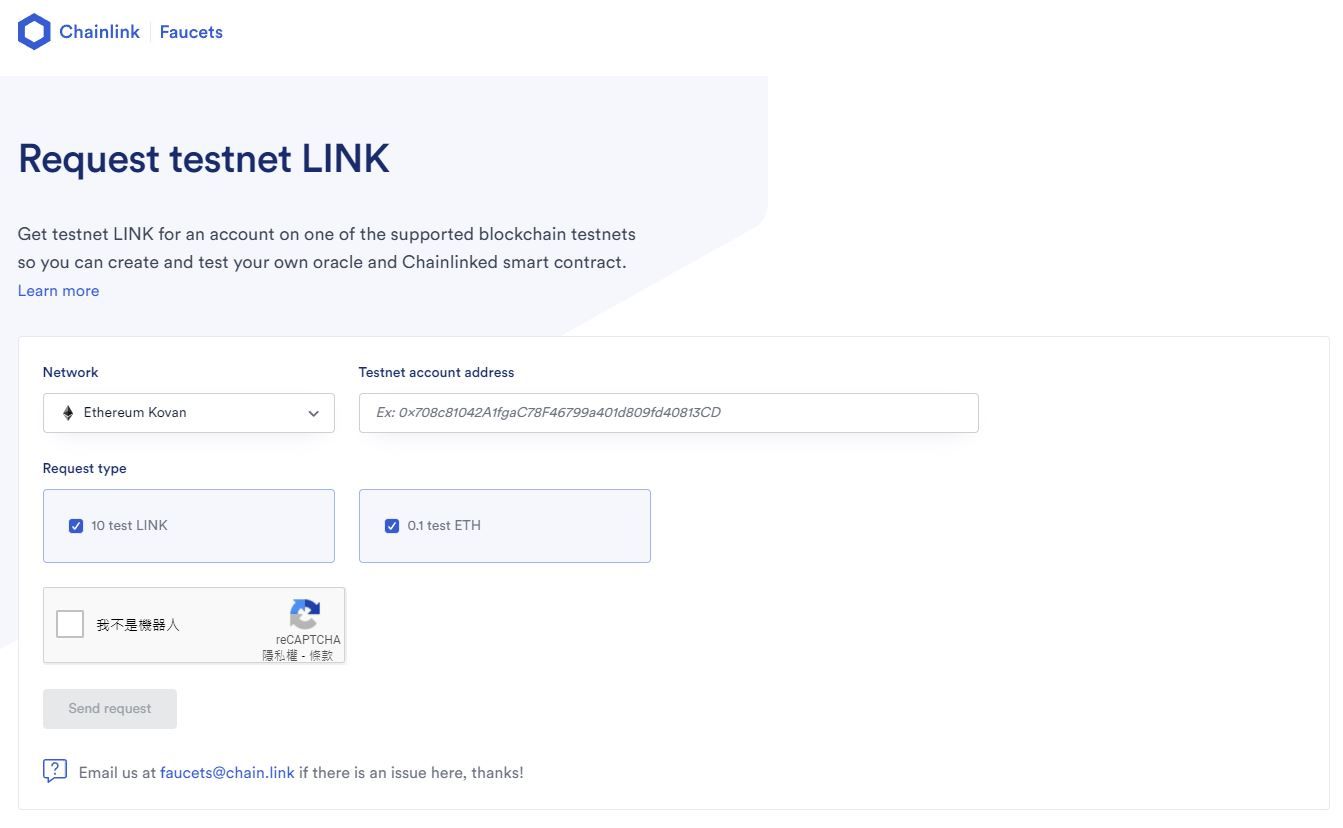
The Network on the left shows the test network Kovan for Ethernet access. Of course, you can click on the drop-down menu to switch to a different test network, but our development will be on Kovan this time, so just get the ETH of the Kovan test network. Enter the wallet address, press I'm not a robot and Sand request.
After pressing, the faucet will send a transaction, transfer the ETH and LINK coins to us on the chain, and see "Waiting for confirmation" indicating that these assets are on the chain, you can wait for a while until it becomes "Request complete" and it is successful ! Go back and open your Metamask wallet to see the 10 Kovan LINK and 0.1 Kovan ETH just sent. Again, the money here is just a toy banknote. Even if you have 100,000,000 ETH, its asset value is 0!
Publishing smart contracts in Kovan
To publish the code on the blockchain, just like the transfer transaction, it needs to be on the blockchain. This matter itself will require Gas fee, which is the handling fee for the chain, so you need to get free ETH first. , you can start publishing after receiving it! To be able to publish on Kovan, you need to change the environment to the test network first, first check whether the Metamask wallet is set on the Kovan test network, and then switch to the first column "ENVIRONMENT" of "DEPLOY & RUN TRANSACTIONS" to "Injected Web3", then Matamask will pop up and ask if you want to connect with Remix. After clicking the connection, ENVIROMNT will display Koven (42) network:
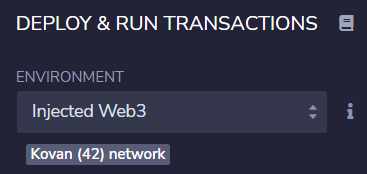
If your Metamask is on another mainnet, L2, sidechain or testnet, "Koven (42) network" will not be displayed at the bottom.
Then it's the same as before, Deploy our token, but this time, your Metamask will pop up a small window asking you to confirm a new contract on the Kovan testnet:
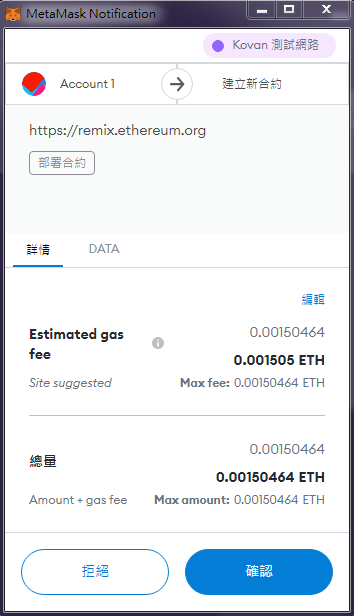
In this example, you can see that if you want to publish this smart contract to the Kovan test network, you need to pay 0.0015 ETH, but the ETH here is the free Kovan ETH (KETH) we just received, KETH and the real exchange The ETH bought is not the same, it has no value.
Add code to Etherscan
If you don't know what Etherscan is, and don't know some basic browser usage, you can go back and refer to the previous article "I bought the last Travelloggers | Blockchain browser with 10,000 yuan" to review, we will use it next.
After a successful release, the code needs to be posted on the chain for anyone to browse, but doing so seems like an unnecessary task, since we've verified ourselves that the code is transferable! So here is a little explanation of the confusion that may arise.
"Some Possible Questions"
Q: Why do you need to put the code on it?
First of all, you should know that the computer only understands the data composed of 0 and 1, and cannot directly understand human language and the code written by human beings. All the software services you are using now are behind the combination of 0 and 1. into the language. Recall how we publish a smart contract. After the program is written, we must first go to the "SOLIDITY COMPILER" to compile. This compilation step is like a language translation process, converting the code written by humans into a computer that can understand language.
In the process of publishing, only the language that the computer can understand is put on it. In fact, the computer language does not have the ability to restore 100% of the original code. For example, the annotations in the code that will not be executed cannot be restored, so in Etherscan There is a function of Verify and Publish on it, let us put the original code on it for verification.
Q: Is there any benefit to putting the code on it? Why do you want to do this?
Now that smart contracts are released, we must hope that someone will use it! It feels like putting a vending machine in an alley, hoping it will be used by more people. However, it is almost impossible for ordinary users to know us as the publisher. At this time, he has no way of knowing whether our coins or services (such as: transfer) can be trusted, so we should put the code on it, At least give users the opportunity to review the code themselves, by browsing the code to determine whether the program behind the contract they are going to use actually performs as the developer says it will.
"Add Code"
Scroll down in "DEPLOY & RUN TRANSACTIONS" to find the "Deployed Contracts" column, there is a duplicate icon on the right:

This TOKEN AT 0X... is the contract we released, and the contract will also have an address when it is created. In this example, the currency we issued starts with 0x9E. Any records that want to track this currency in the future must be made through this address. Query, now copy the address, the next step is to go to Etherscan to find the content of the contract just released, and add the code of the contract.
Kovan is the test network of Ethereum, so there is also a Kovan version of Etherscan, the URL is: https://kovan.etherscan.io/ After entering, paste the address you just copied in the Search box to search:
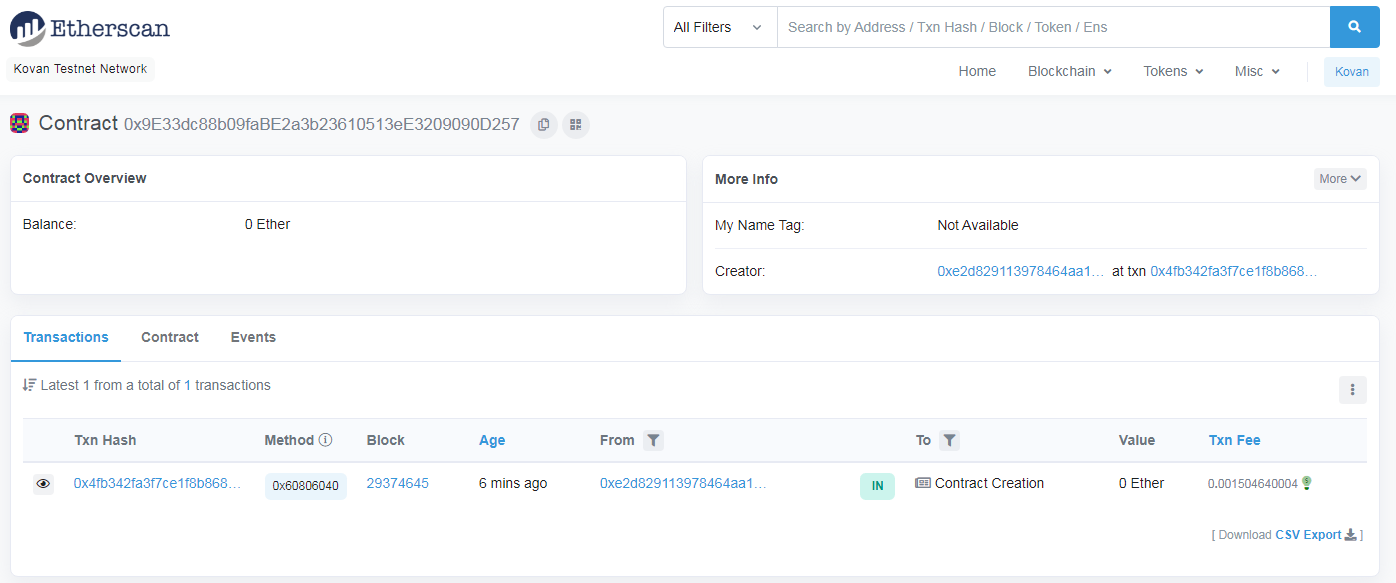
After searching, you will find the contract just released on Remix. You can see that the creator's wallet address will be the address where you released the contract!
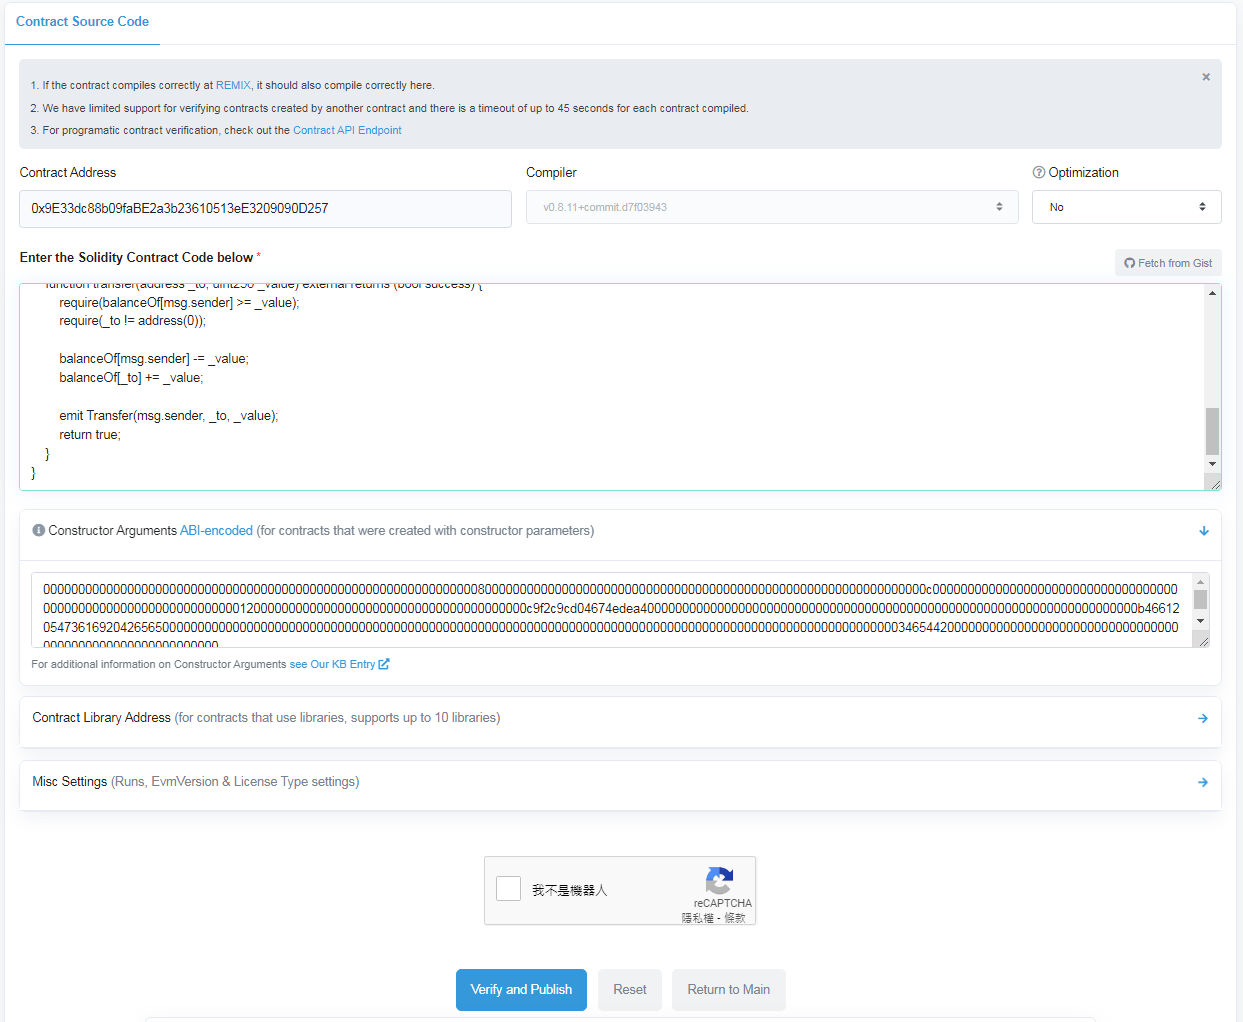
Next, click on the Contract below, and you will see a bunch of garbled things. This thing is the language for the computer to read. It can also be called "Byte Code". Click Verify and Publish.

After entering the Verify & Publish Contract Source Code page, you need to enter the wallet address, the programming language to be compiled, the programming language version and the license. thing.
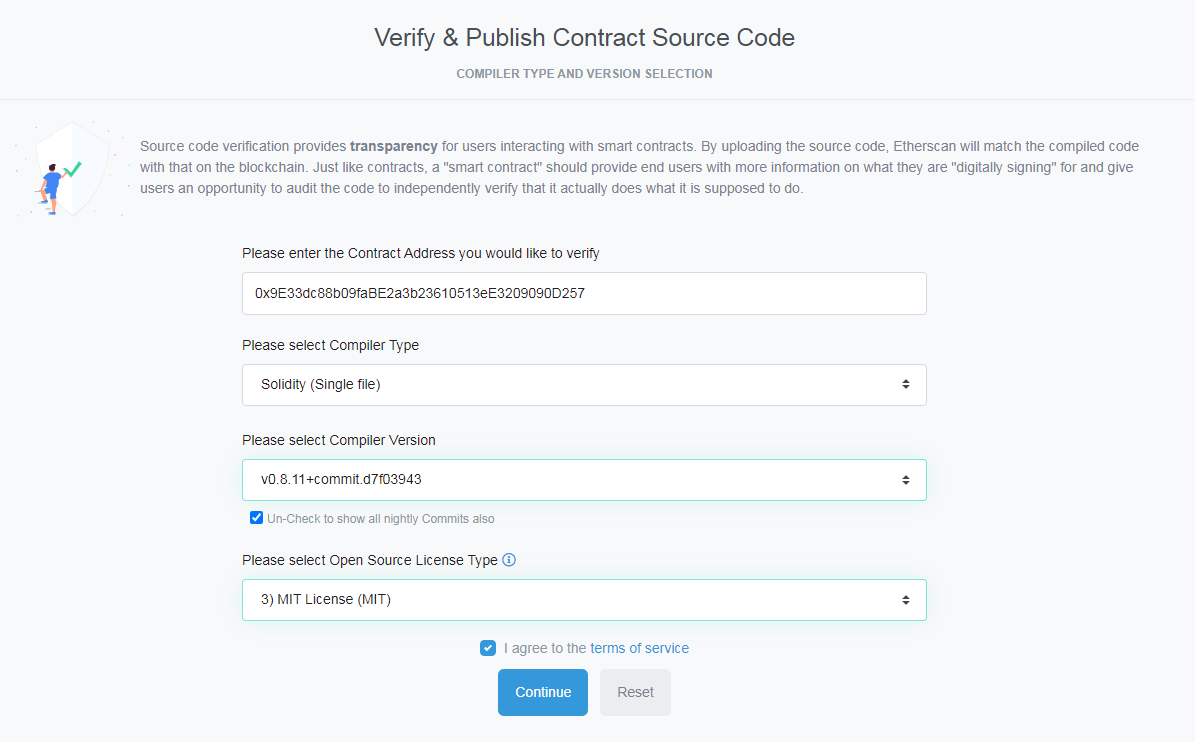
Then copy and paste the complete code into "Enter the Solidity Contract Code below", click Verify and Publish to complete the upload of the code.
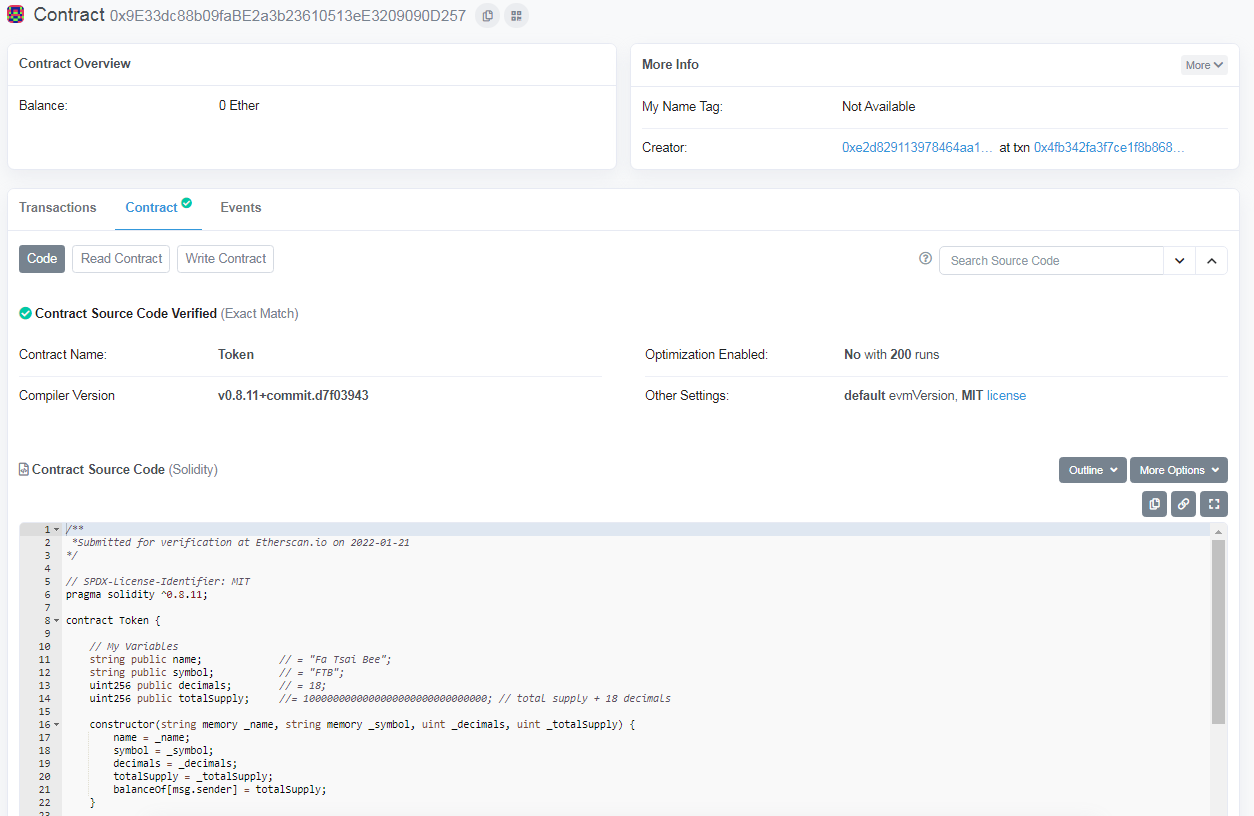
After the upload is complete, when you go back to the contract page, you will find a green tick on the right side of the contract, which means that the contract has code attached and has been verified by EVM.
So far, the release of the smart contract has been completed. Let's take a look at the actual use of this coin. You will need to open a second wallet as a payment wallet.
transfer money
Next, we will do the same thing as the previous article, which is to actually transfer money. Since most of the processes are exactly the same, I will simply take it. If you forget, you can review the previous article and look again.
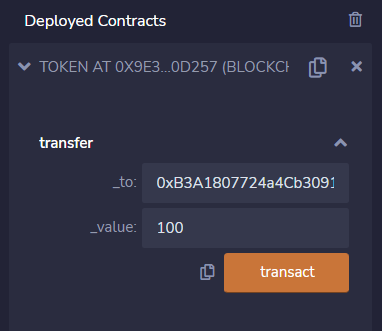
Since the cryptocurrency we issue does run on the blockchain, you can choose to go back to Remix or use Metamask to transfer money directly. Here we will use Remix as a demonstration, enter another in "DEPLOY & RUN TRANSACTIONS" Transfer the address of the wallet and the amount to be transferred:
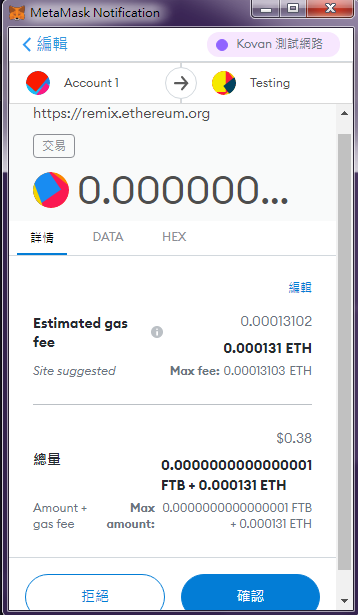
Metamask will ask you to confirm whether you want to send this transaction. Since the transaction needs to be on the blockchain, it will require ETH as the handling fee. From this picture, we can see that the estimated handling fee is 0.000131 ETH, and the amount to be remitted is 0.0000000000000001 FTB (Because we filled in 100 in _value, the smallest unit of _value is called wei, and wei means 10e-18):
After confirmation, wait for the transaction record to be successfully uploaded to the chain, and the small window of the little fox will run out:

Use the balanceOf we wrote on Remix to query the cryptocurrency balances of the two wallets as last time. Since 100 wei cryptocurrencies are remitted, 100 will be deducted and 100 will be added:


Query transfer records on Etherscan
Then go back to Etherscan, the URL is https://kovan.etherscan.io/ , enter the address of the smart contract as well, and you will see an additional Hash in Transactions:
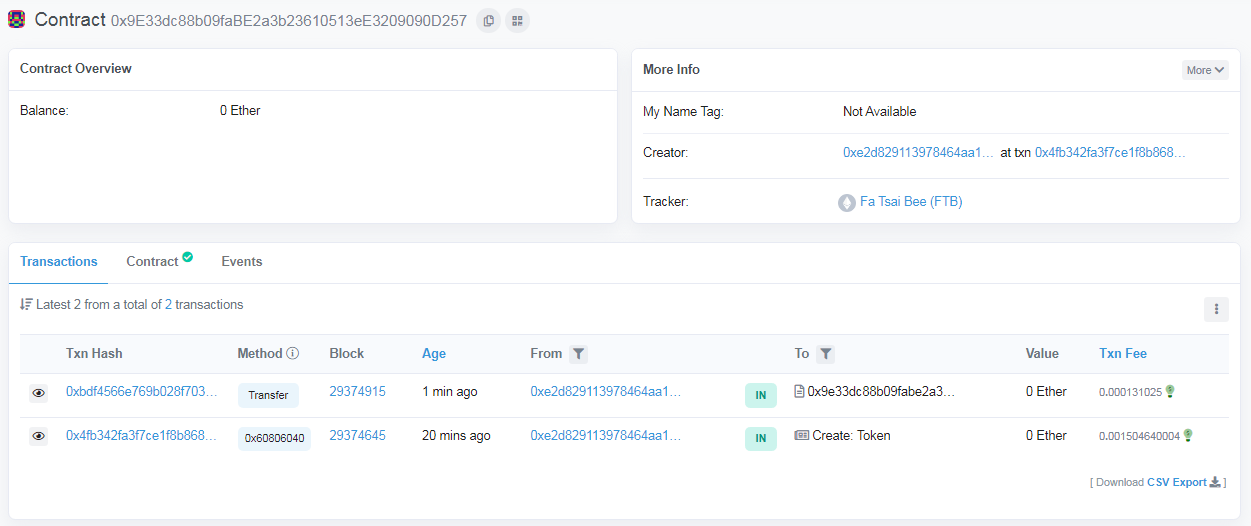
The first transaction at the top is the record we just transferred. If you want to see more detailed content, you need to click on the Hash at the beginning of Txn Hash 0xbd, and click on it to see the details of this record:
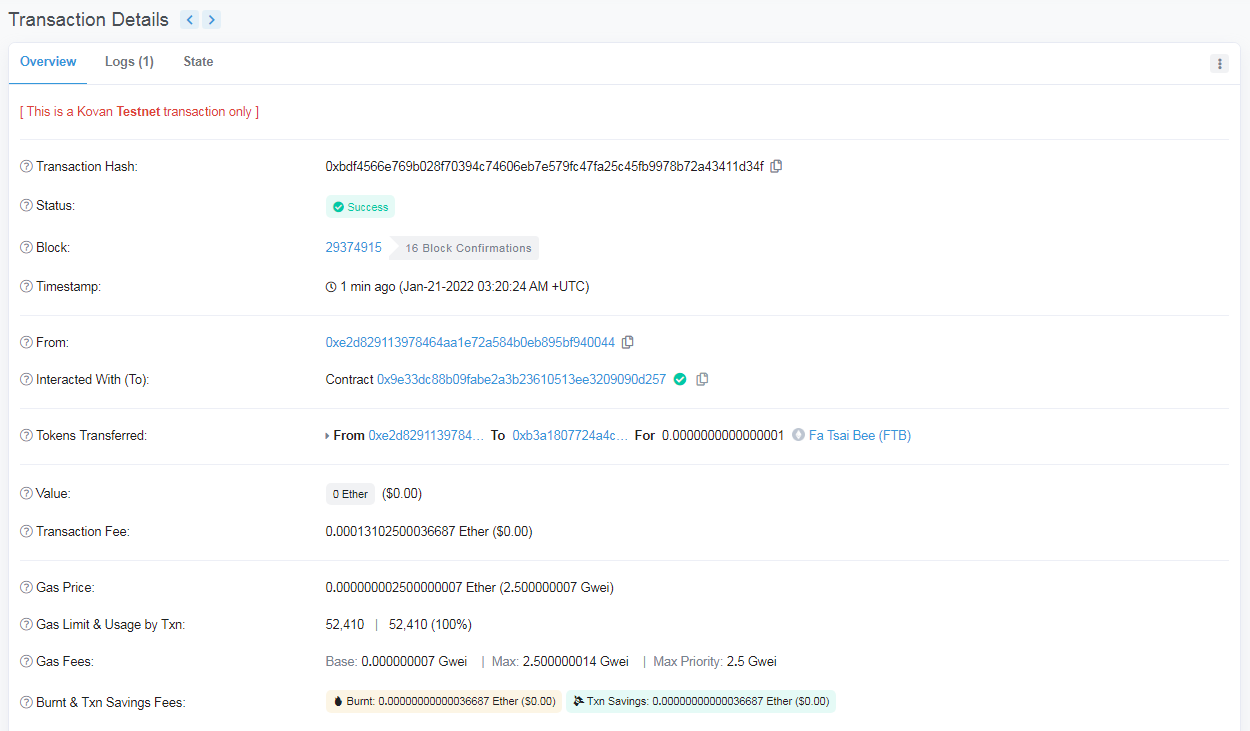
Here you can clearly see who (From) calls which smart contract (Interacted With), who (To) and how many (For) cryptocurrencies (Fa Tsai Bee, FTB) are given, and how much ETH (Transaction) Fee).
full code
If you want to see the complete code, I will put it on Github at https://github.com/ITechNote/FaTsaiBee where FaTsaiBee.sol is the complete code.
It mainly contains the code of the past four articles, including First.sol, TransferToken.sol.
Among them, FaTsaiBee.sol is the complete version of the code. If there is a chance in the future, I will talk about what allowance and approval are here, and the information security issues derived from it.
Easter eggs
If there is no accident, I will post another article during the Chinese New Year. The main theme is that I issued my own technology coin (IT Coin, ITC) on Polygon. At that time, there will be free ITC coin rewards for airdrops as reader feedback. Coin holders There will be some special benefits in the future!
At present, it is planned to distribute airdrop quotas in my FB fan club, Line community and Telegram group. The airdrop quota is limited and the first to win. For more information, please continue to pay attention to future articles, so welcome to join or follow the following three platforms first, master First-hand information:
FB fan link: ITechNote technology essay
Line Community: Tech Essays Off-Site Rest Area
Telegram group: ITechNote technology essay exchange community
Further reading
Previous: [New Year's Plan] This coin can jump around like a living thing | Smart contract development plan #3
Finally, thank you for taking the time out of your busy schedule to read my articles. If you still like these content, I hope to get your follow-up and support. You are also welcome to click this link to find me on other platforms .
See you next time o((>ω< ))o~
Original link ITechNote technology essay
Like my work? Don't forget to support and clap, let me know that you are with me on the road of creation. Keep this enthusiasm together!


- Author
- More