
Look
The most detailed ClashR tutorial/ClashX tutorial/ClashA/ClashWeb/Pharos pro (multi-platform version)
Update comment added
Recommended for stable high-speed airports:
Clash does not support ssr by default, only clashR supports it, and the kernel of Clash needs to be replaced
Clash versions (win, mac, linux) use tutorial, add rules, with Proxy SwitchyOmega
Airport Subscription Conversion : Include: SS(R)/v2ray to crash(R)
Clash/clashR
1. Windows version:
1.clash for windows
Does not support SSR, telegram groups
If you want to support SSR:
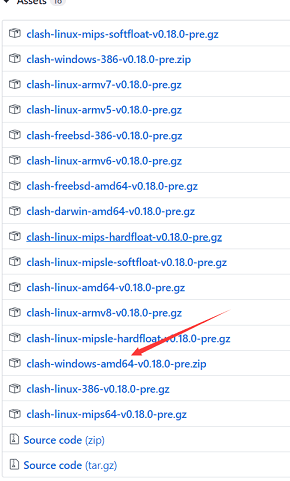
Change the kernel based on the above CFW:
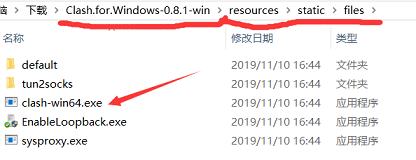
Download the kernel file and rename it to crash-win64.exe
Replace the kernel file crash-win64.exe in the resources\static\files folder of CFW
Tutorial:
Step 1: Set the node information, click on Profiles on the left
SUBSCRIBE LINK AND PROFILE CHOOSE ONE!!!
1) If using a subscription link: paste the subscription link - then click download - prompt Success
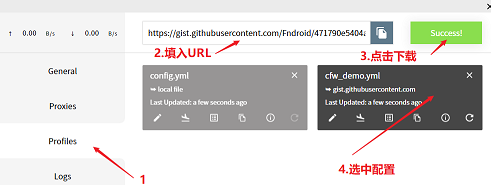
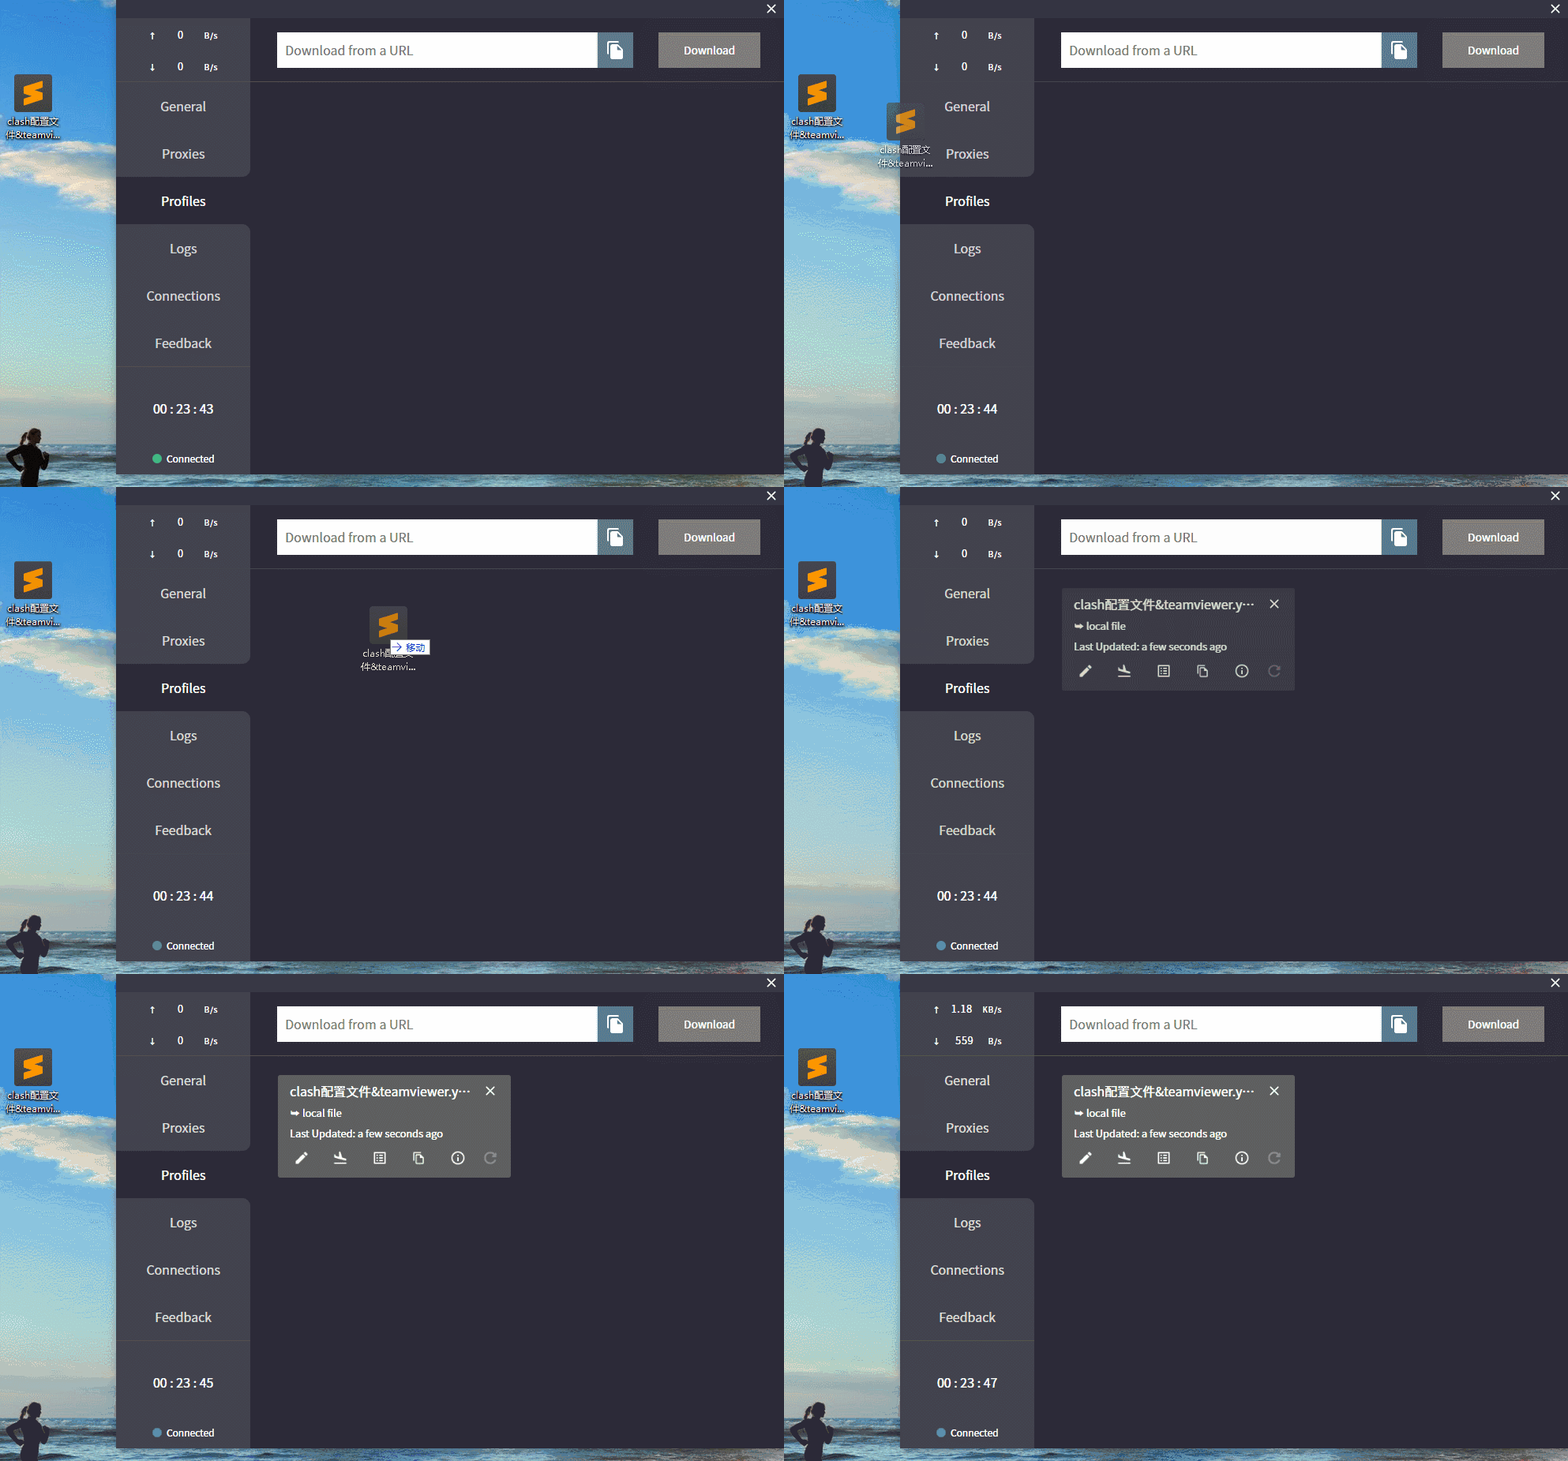
2) If you are using a configuration file: directly drag the local yaml format configuration file to the page, click to select the configuration just now! ! ! Choose to darken.
If the connection is successful, Connected will be displayed in the lower left corner.
Step 2: Set as System Proxy
Open method: Click on General on the left - click on System proxy! ! ! You can set the boot to start automatically: click Start with Windows;
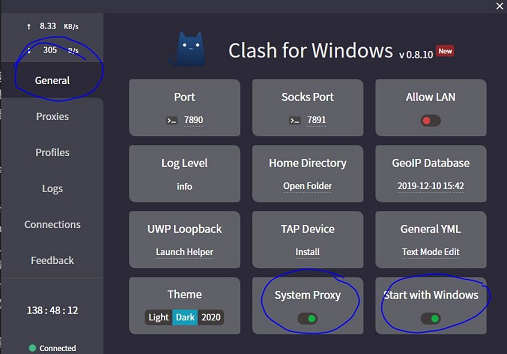
If you are using a subscription link, you can set up automatic regular update subscriptions (optional)
Click [Profiles] - click the change information button - enter the name casually - enter the time for the regular update (integer of hours, 24 is good)
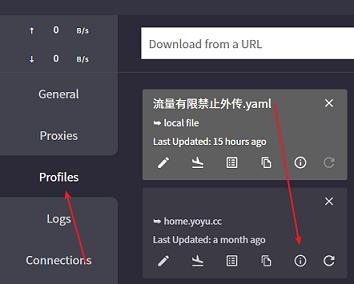
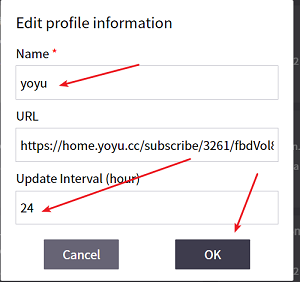
Detailed tutorial:
2.mini web version: ClashWeb
Advantages of this version: small memory footprint
For files ending with withoutpython.7z, you need to install python and install the dependent packages yourself; for convenience, please download the packaged files without .7z ending withoutpython below.
1) Start: Double-click the ClashWeb.exe file
2) Turn on the agent: right click on the cat icon in the lower right corner of the desktop - Clash - start crash
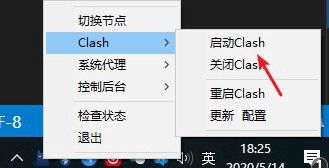
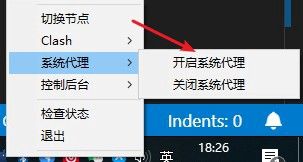
3) Set as system proxy: right click on the kitten icon in the lower right corner of the desktop - system proxy - open system proxy
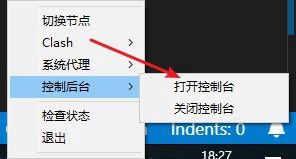
4) Open the console: right click the cat icon in the lower right corner of the desktop - control the background - = open the control background
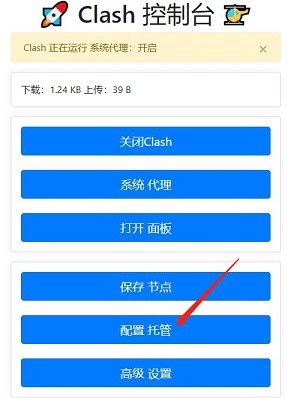
5) Set node: subscribe link/select configuration file: click [Configure hosting]
If it is through a subscription link: paste the subscription link below the subscription address, then [click to download configuration] - then click [restart Clash]
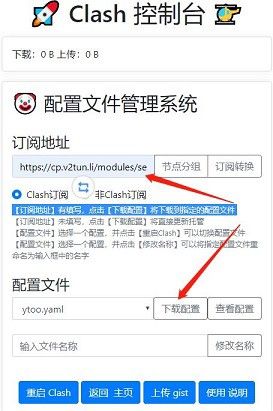
If there is no crash subscription link, the software comes with ss/v2ray subscription conversion Subscription Converter, click [Subscription Conversion]
If you are using a configuration file: the configuration file needs to be suffixed with yaml, and then copied to the Profile folder, refresh the page - page [Configuration File] select the file you just copied - click [Restart Clash]
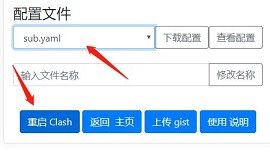
If you need to modify the rule/configuration file information, directly click [View Configuration] in the console - after modification - click [Modify Configuration] - [Restart Clash]
6) Click [Open Panel] - enter the node selection information, logs, rules, settings page
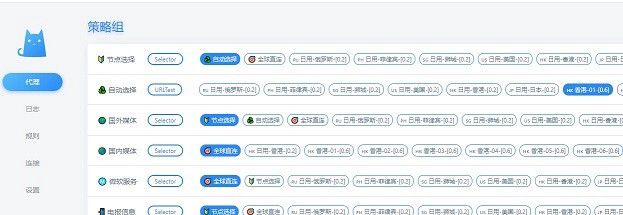
If it shows success after restarting the crash, it means that there is no problem, and if it fails, it means that there is a problem with the configuration file.
Second, the mac version:
mac installation file:
clashXR : Support SSR
Choose between a subscription link and a profile!
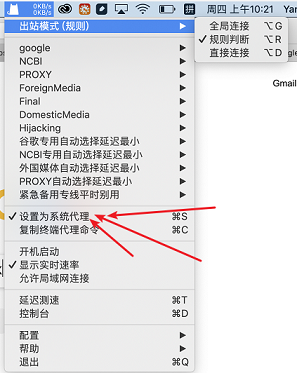
First of all: change the outbound mode to [rule judgment]
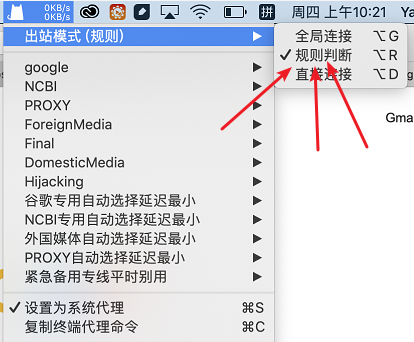
If via subscribe link
details as follows:
1. Click [Configuration] - [Managed Configuration] - [Management]
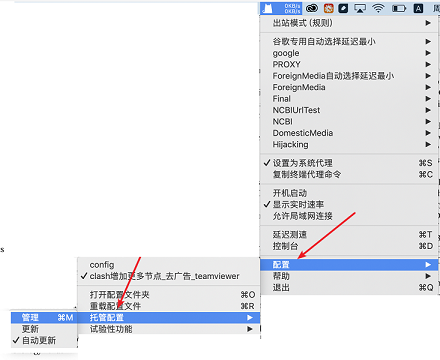
2. Click [Add] - fill in the link and give the name you want - click [OK]
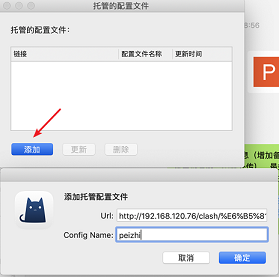
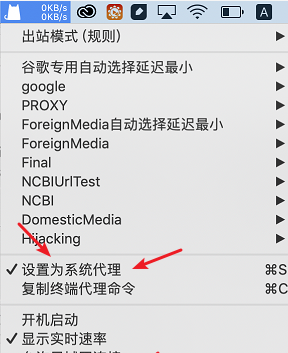
3. Set as system proxy
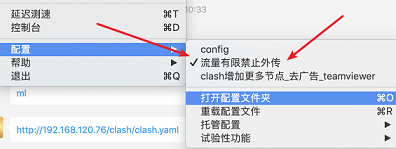
If through a configuration file: Click on the status bar icon - Configuration - to open the configuration folder
1. Click on configuration - open configuration folder - drag the downloaded yaml file into the folder
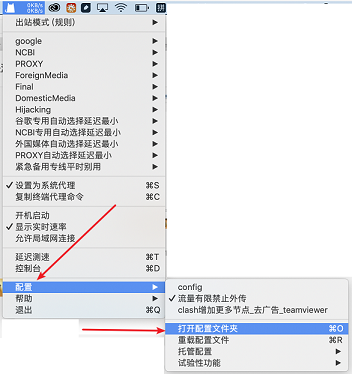
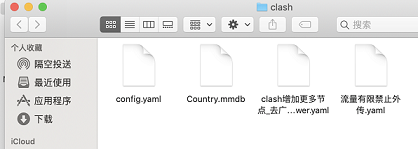
2. Click Configure, and then select the configuration file just now
3. Finally, check "Set as system proxy" of ClashX to start using
3. Android version:
1) clash_for_android : support SSR, recommendation, telegram group
Add a profile: Click [Profiles] - [New Profiles]
[File] – through the configuration file, first save the file to the phone
[URL] – via subscription link
Click Stopped to turn it on, it becomes Running after turning on
Proxy : node selection
2) ClashAR : Support SSR
3) ClashA
4. IOS version:
In general iOS, everyone recommends shadowrocket, Quantumult(X), kitsunebi, but quantumultX's function of automatically selecting nodes for health detection is always inconvenient. Recently, Pharos pro supports importing crash, importing local yaml files or downloading remote yaml files.
You need the US id to buy and download, go to Taobao or the card issuing network to buy: https://dlj.tf/rBQ1Id
Official telegram group: https://t.me/Pharos_x_Announcements
Import method: Click "+Add" in the upper right corner - "Manual input" - "clash"
1) "Import configuration from local": To import a local crash yaml format file, you need to save the crash file in the phone first
2) "Download Configuration": remote crash subscription
Import video reference:
Local file: https://t.me/ysl_channel/718
Remote crash subscription: https://t.me/ysl_channel/737
Five, linux version:
GitHub project address , download the corresponding installation package
Clash adds rules
Rules match:
DOMAIN-SUFFIX means adding a domain name, such as: goolge.com, matching the entire goolge.com website
KEYWORD means adding a keyword, such as goolge, to match URLs whose URL words include "goolge", such as aagoolge.xyz, goolge.com, agoolgeb.com/help, etc.
IP-CIDR means specifying ip: For example: 13.105.218.23/32, means matching the entire ip
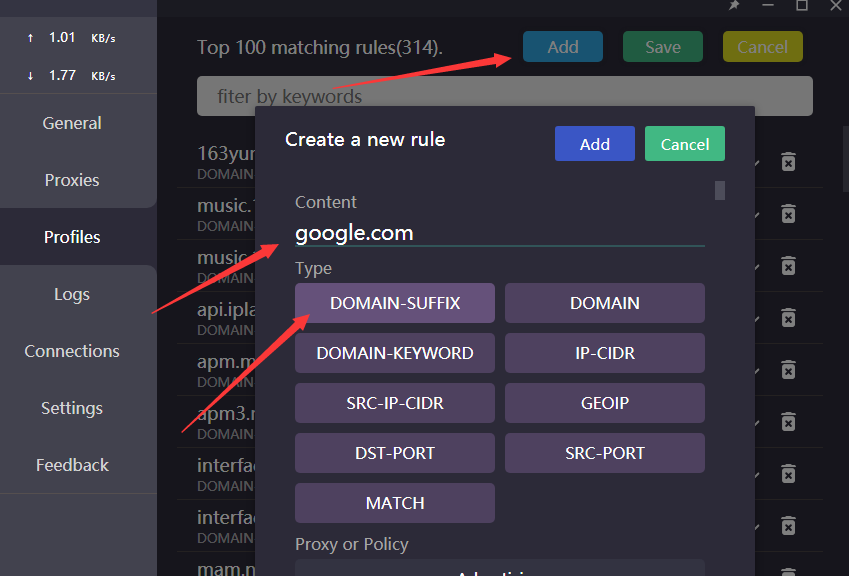
Select the Profiles page
1). Clash page add:
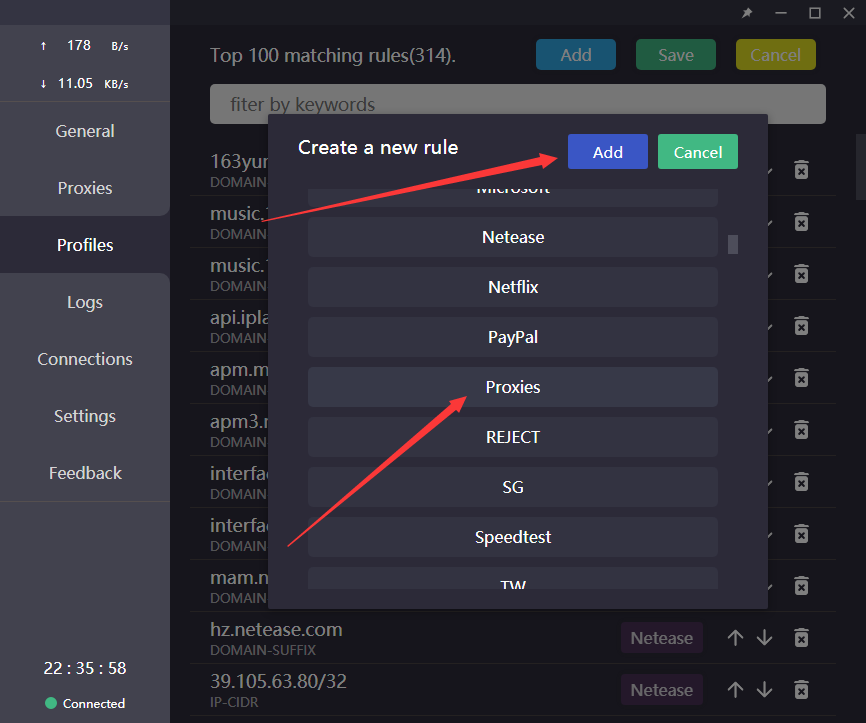
Middle Edite Rules-Add-Add a keyword or domain name-select a line-save
For example, for google.com, the entire URL is set to go through the proxy and specified as the policy group Proxies:
2). The configuration file adds:
Click Edit in text mode – pull to Rule
chestnut:
DOMAIN-SUFFIX means adding domain names
- DOMAIN-SUFFIX , http://google.com/,google: Indicates that all pages related to the URL http://google.com/ go to the policy group Proxies
- (-DOMAIN-SUFFIX, domain name, designated line)
KEYWORD means adding keywords
- DOMAIN-KEYWORD,google,google: Indicates that all URLs with the string google go to the policy group google
- (-DOMAIN-KEYWOR, keyword, specified line)
IP–CIDR means specify ip
- IP-CIDR, 13.105.218.23/32, US server: Indicates that those whose ip is 13.105.218.23 will go to the US server policy group
- (IP-CIDR, ip address/32, designated line)
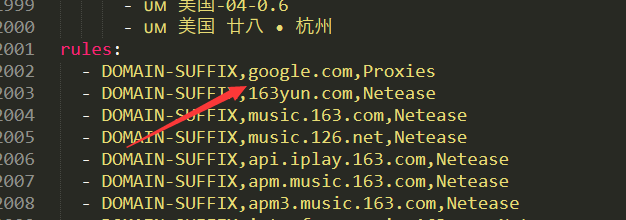
Specific example:
yml configuration file:
Proxy Group: : represents the policy group
Example 1:
For example, you need to put all the lines in the United States into a policy group, and let a certain IP or website go through these lines at the same time
like:
- name: US server
type: select
proxies:
— DIRECT
— Daily American 01 [0.2]
— 🇺🇸 Daily-US-[0.2]
— 🇺🇸 USA-01-(1)
— 🇺🇸 USA-02-(1)
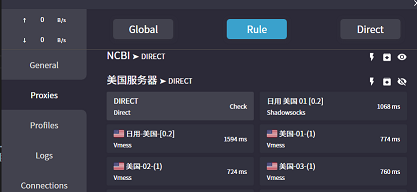
Create a group named US server. The type is select, which means that you choose the line yourself. Proxies is the name of the node that can be selected. The default is DIRECT, which means direct connection without proxy.
Add rule:
- IP-CIDR, 33.106.219.23/32, US server
- Indicates that the ip 33.106.219.23/32 goes to the US server group, and the default is direct connection.
The Proxies page shows the following:
Example 2:
Suppose I have three nodes: 🇭🇰 Hong Kong-01–0.6, 🇭🇰 Hong Kong-02–0.6 , 🇭🇰 Hong Kong-03–0.6.
I need to set the URL containing google to go to the specified policy group google, and this policy group can select the node with the lowest delay by default, and can also specify the node:
1) First set up a policy group named google-auto with the lowest automatic selection delay:
- interval: 300
name: google-auto
proxies:
— 🇭🇰 Hong Kong-01–0.6
— 🇭🇰 Hong Kong-02–0.6
— 🇭🇰 Hong Kong-03–0.6
type: url-test
url: http://www.gstatic.com/generate_204c
The type is url-test, and the nodes under proxies will send requests to the website http://www.gstatic.com/generate_204c in turn, and automatically select the node with the lowest delay.
2) Then create a google policy group
- name: google
proxies:
— google-auto
— 🇭🇰 Hong Kong-01–0.6
— 🇭🇰 Hong Kong-02–0.6
— 🇭🇰 Hong Kong-03–0.6
type: select
Here type is select, indicating that the node is self-selected, and the default is the first node, which can be a line or another policy group, here is the policy group google-auto.
3) Write which websites in Rule need to use the above strategy group
Rule:
— DOMAIN-KEYWORD, google, google
— DOMAIN-SUFFIX, wikipedia.org, google
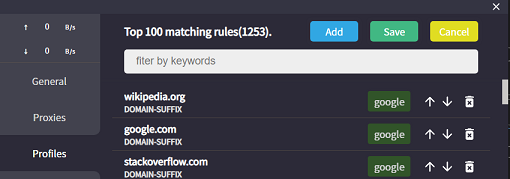
Here is the website with the string keyword google in the URL and the wikipedia.org website both go to the google policy group, and the default is google-auto. The google-auto policy group will select the line node with the lowest delay among the three lines by default. When a line is hung up, other lines will be automatically selected, and there is no need to manually switch. At the same time, Google can choose it by itself. If you don't want to default to the line selected by itself, you can also specify a line yourself.
The Proxies page shows the following:


rule:
SwitchyOmega browser plugin (optional)
If set to system proxy it will all be distributed via crash. If you don't want to set it as a system proxy, you can match it
SwitchyOmega browser plug-in usage
chrome web store search Proxy SwitchyOmega
Can't open it? https://www.gugeapps.net/Search and download here;
Then install this method offline installation
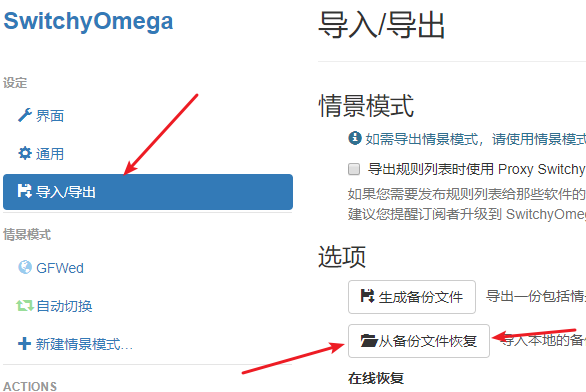
Click on the left: import/export, restore from backup file
1. New profile - select proxy server - proxy protocol select HTTP - proxy port select 7890
name it whatever you want
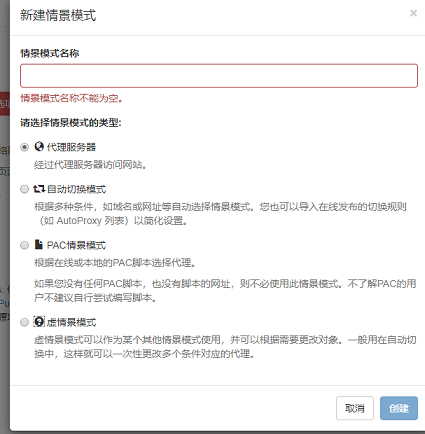
The above indicates which agent to go when you go to the agent, and the information of the agent is filled in.
The following automatic switching is similar to the PAC mode, and the proxy is only used when the proxy is required; (if the crash already has a shunting rule, it can be omitted when it is matched with the crash)
Others have summed up a list of website rules that need to go through the proxy
2. Click on automatic switching - select AutoProxy - paste the address of the rule list - update the scene mode immediately (if the crash already has a shunt rule, you can do it with the crash)

The rule list rule needs to be selected as the proxy just set, here is GFWed
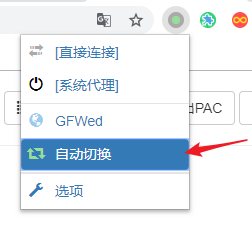
Choose to switch automatically, indicating that you need to go through an agent before leaving;
Without automatic switching, choose the agent you created yourself (such as GFWed here)
Like my work?
Don't forget to support or like, so I know you are with me..
Comment…